Overview[ | ]
This article explains how to do modding that goes way further than Content Packs that the Shadowrun Editor is capable of creating by modding game files (asset bundles, to be more specific). You'll need applications to extract, modify / hack and re-import assets into the game standalone asset bundles. These deep mods are not subscribed through Steam, so you'll need to supply executable files and instruct end users on how to use them. So far, possibilities are quite bold, especially if you have artistic abilities:
- Replacing textures for 3d characters, outfits and items in general
- Replacing icons for abilities, weapons, spells etc
- Replacing and adding animations
- Replacing and adding audio
- Adding new item prefabs with textures
- Adding new character models with textures
- Adding new player outfits
This is deep modding, but not as deep as modifying game mechanics, which would require programming into the game engine itself.
(However, if you actually want to modify the game code and have C# skills you can use a tool called dnSpy on the Assembly-CSharp.dll file inside the \Shadowrun_Data\Managed folder)
Tools[ | ]
- Unity Studio GitHub or Executable
- (Optional) Unity : Shadowrun Returns and the sequels were made with Unity. It's a professional tool, but if you're doing it as a hobbyist, non-profit you can download the Personal edition for free.
- (Optional) Blender or your favourite 3d modeler, GIMP or your favourite image editor. MakeHuman might be quite useful for metahuman (not the Unreal engine Metahuman!) character creation.
Exploring Asset Bundles[ | ]
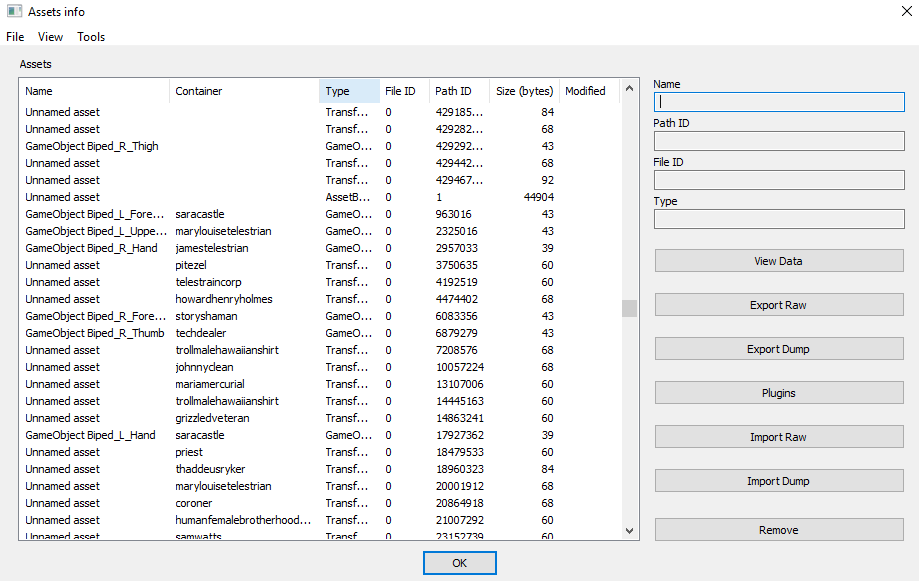
Asset bundles are fiddly, because they were made to speed up scene loading time while still reducing game resource file size, and there are lots of internal references within bundles that could easily get you lost. They are almost all located in the \Shadowrun_Data\StreamingAssets\standalone\Seattle (or Berlin or HongKong) folders. The remaining ones are in \Shadowrun_Data\ , namely resources.assets, sharedassets0.assets, sharedassets1.assets and so forth. The resources.assets bundle contains most of the menu and icon basic game data. Music is in there too, but it's not immediately recoverable with UABE. For music see this other article. Inside the \standalone\ folders you'll find the bundles with the character meshes and textures, audio, animations and VFX.
To explore a bundle with UABE, first backup the original file by creating a copy and renaming it or adding an extension like .bak, run AssetBundleExtractor.exe and select File -> Open. Select the assetbundle or assets file. Large files may take a while to load. Click on Info. The list might be overwhelming: there are many unnamed assets, and not many have containers in the Container column. One easy way to find stuff is to sort by Type.
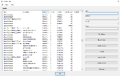
UABE's interface
Changing Textures and 2D data in general[ | ]
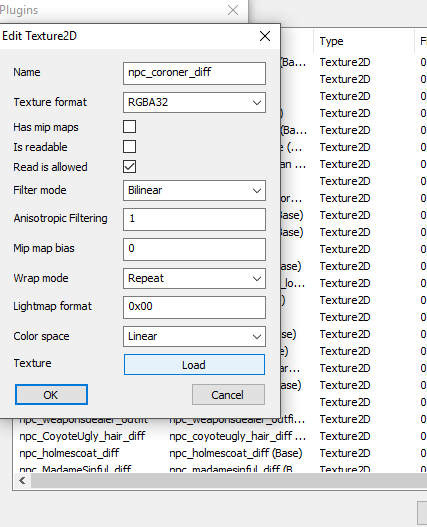
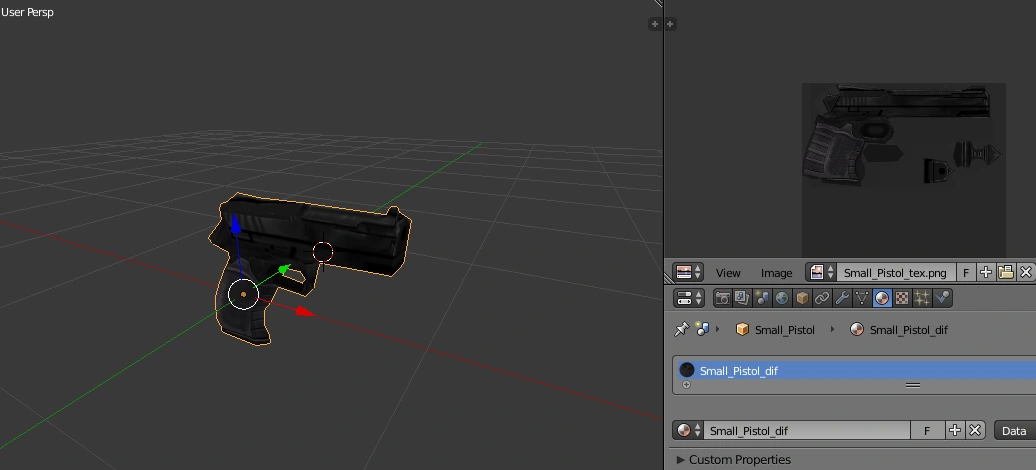
The most straightforward assets that can be changed for great effect are 2d textures, icons, menu buttons, even the title screen. Sort by Type and scroll to find the Texture2d assets. Click on the texture asset, click on the Plugins button and you'll see options to export to .png, .tga or Edit (replace) the texture. Export to png, edit the texture (keep exact same image size and work with png!) with an image editor like GIMP, save it, and then back in UABE, click on Plugins -> Edit and Load your new png texture. Do that for as much 2D data as you like. An asterisk on the Modified column will show that the asset was modified. Textures do not follow the same pattern for all NPC characters because the developer may have designed a mesh's UV map according to the outfit complexity, so one NPC's texture might not suit another NPC. However, textures do follow the same pattern for core characters of the same race and gender. More on this in the outfits section.
Replacing a texture

Jake Armitage's texture in seattle_characters_story.assetbundle.

Colt Manhunter's icon in resources.assets
Feel like giving the Title Screen a new feel? Replace mainMenuBG-SRR Texture2D for any 1920x1200 24bit png
Icons for Dragonfall's weapons are included in the Shadowrun Returns resources.assets file in the most recent versions of the game


In the Assets info list, select File -> Save then Close. Back in the main Extractor window if you select File -> Save you'll save a new bundle with the modified texture(s). You have to either save with a different name in the same folder as the original bundle or in another folder with the same name, because UABE does not support overwriting. However, selecting the option to create an executable will be smarter for you, the end user and save space (read further).
Viewing your Texture on the Mesh with Unity[ | ]
Of course, you could just test-run a scene from the Shadowrun Editor with an actor that has the prefab whose texture you're modding, but it might be a tedious effort repeating all steps in the previous section until the texture looks exactly the way you want it in the game. So, you can hack Shadowrun's assets back into Unity, whence they came from, and check your .png textures on the prefab mesh in a much easier way.
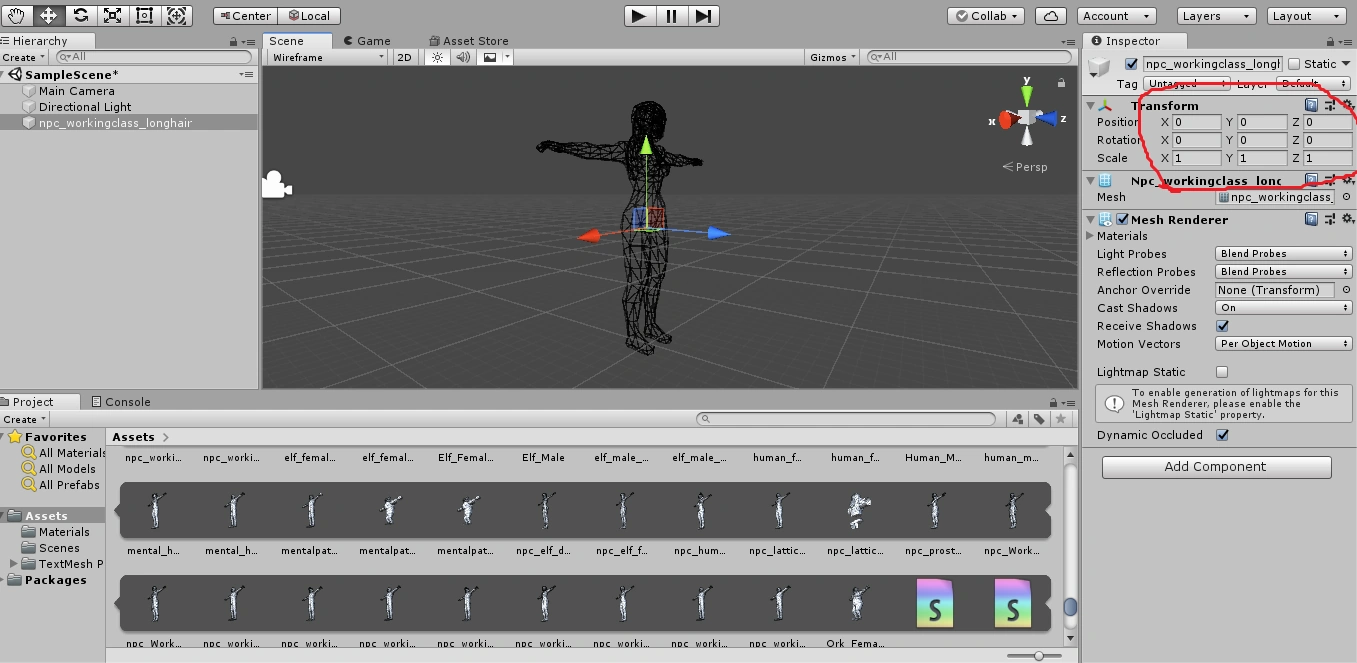
Open the original assetbundle in UABE. Click Export. Instead of saving with the .assets extension, save it with the .asset extension, without an "s". Open Unity, create a new 3D project, select Assets -> Import New Asset and browse to the .asset file you created. The package is going to lose all hierarchy and objects are going to be broken in all their components, and the result in the Project window is just a mess of orphaned components, but meshes and textures should be okay. Filter by name to find the assets you need more quickly. You can then drag the desired mesh to the scene. Set position transforms to (0,0,0).
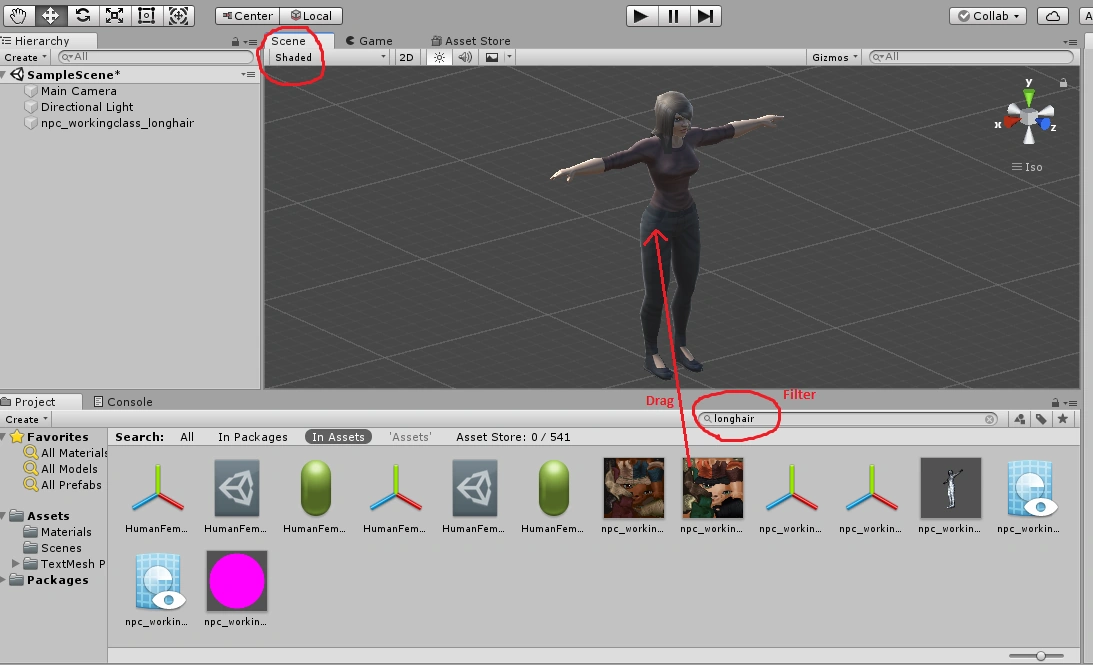
Set shading mode in the Scene window to Shaded, if it isn't already. You can then import the .png texture you're modding / painting to the Asset List and then drag it over the corresponding prefab mesh and check if it's OK. If it's not, delete the texture from the asset list, modify it in your image editor, save it, re-import it and drag it over the mesh again.
Unity Studio[ | ]
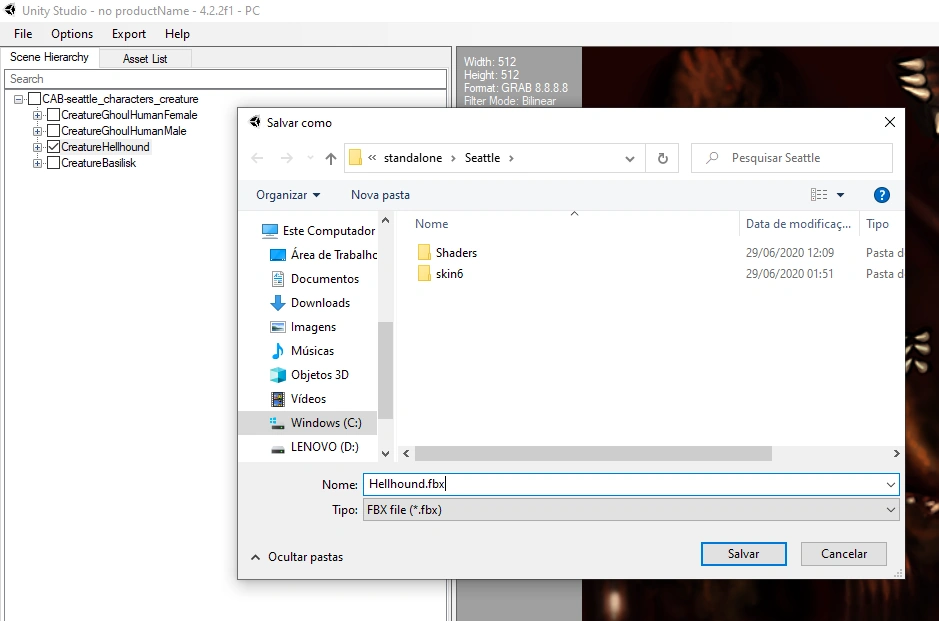
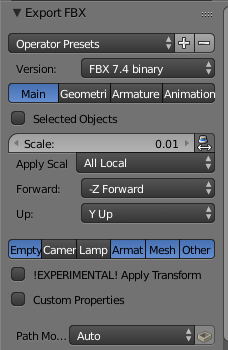
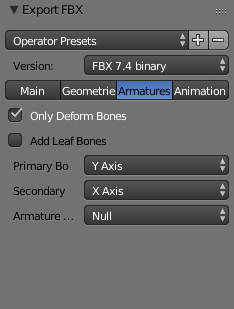
HUGE update: This application I mentioned in the Tools section explores and extracts 3D assets with all object hierarchy. That means the rigged working skeleton! Open the desired assetbundle in Unity Studio (browse bundle files), navigate to the desired 3D object, select it and choose Export > Selected 3D Objects. It will create an fbx file plus a Texture2D folder with the textures. You can also export the HBS Shaders from the Asset List tab and rename the .txt files to .shader files.
The resulting fbx files can be opened by Unity but not by Blender since they're ASCII. To convert ASCII fbx files to binary, there's a free Autodesk app that does that. Also, since Blender usually messes up fbx armatures and bones real badly, you might need the Blender addon mentioned in the Tools section.
Replacing Weapon Icons[ | ]
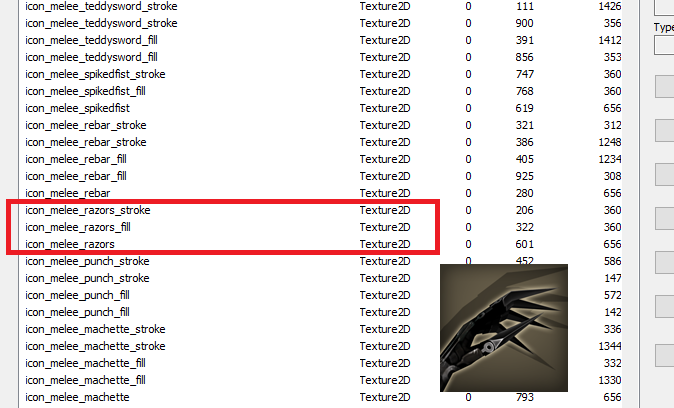
Firearms use ammo, and therefore they appear partially filled in combat when shots have been fired, and the fraction of ammo the selected attack will spend appears in yellow. Apart from the 128x128 store/inventory icon, the gun needs a "stroke" icon and a "fill" icon for the combat UI, both in white against a transparent backdrop. The "fill" icon is managed by the game to fill the outline that is the "stroke", according to the ammount of ammo left. Melee weapons also need the fill and stroke icons, but they are shown always full in the UI.
Since all icons must be in the resources.assets file, you can only replace icons using UABE. Choose one weapon to replace the icon_xx_xx, icon_xx_xx_fill and icon_xx_xx_stroke icons using the Plugins - Edit feature. Drafonfall weapons have a set of three icons for each weapon. SRR has five icons, including a smaller fill and a smaller stroke icons. When you create your new item in your UGC data/items folder, use the parameter icon: "icon_xx_xx", being this the name of the icon you had modified in resources.assets. The gun must be horizontal and the muzzle must touch the right border in the stroke and fill icons. Their lengths may vary, but the height should be somewhat the same as other weapon icons. Here are examples of icons for a new gun ready to be used in resources.assets:
fill
stroke
inventory icon
in combat UI with 1/5 ammo spent

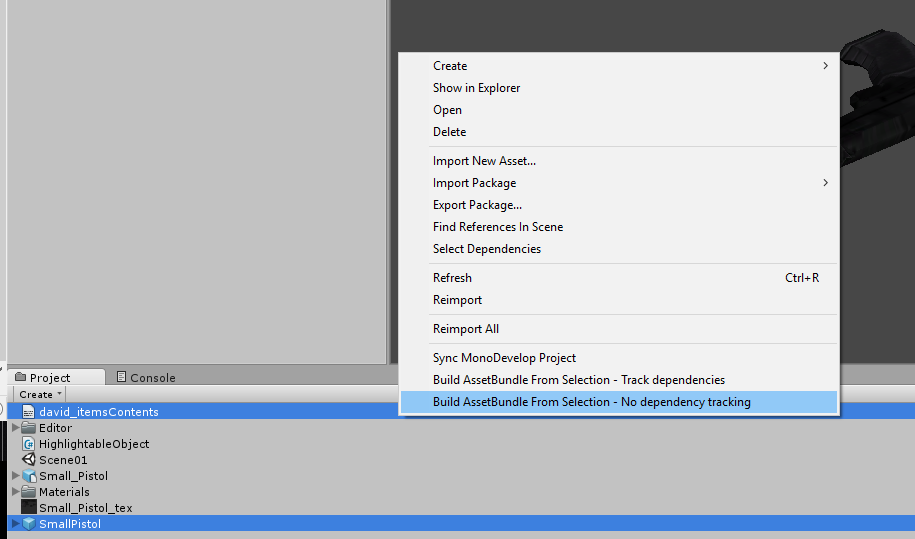
Creating an Executable for your Mod[ | ]
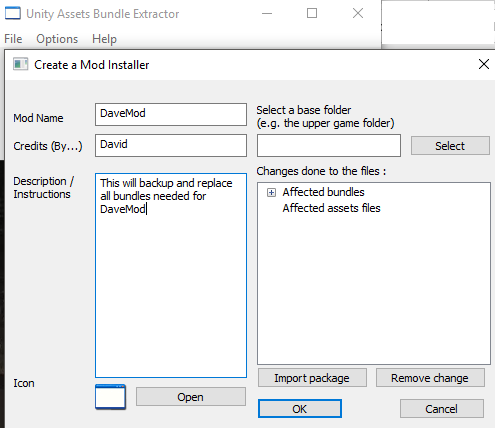
Creating an executable for your mod will automate the modding process and save everybody's time. If you read UABE's Usage.txt file, you'll also learn how to do batch file modding. After you have saved your work for multiple asset bundles, select File -> Mod Maker -> Create standalone .exe installer. Here you can name your Mod, credit yourself(ves), give instructions, load an icon for the exe, review the bundles changed and select the upper game folder. It will then create an installer for your mod that should be easy to use for all end users. 32bit UABE will create installers for both 32 and 64bit systems, while 64bit UABE will create installers for 64bit systems only.
Custom NPCs without 3D Modelling[ | ]
An easy way to create original NPCs that look great without 3D modelling is to create a unique outfit that fits just the race and gender of the NPC you made up. Check the outfits section.
3D Character Simple Scaling[ | ]
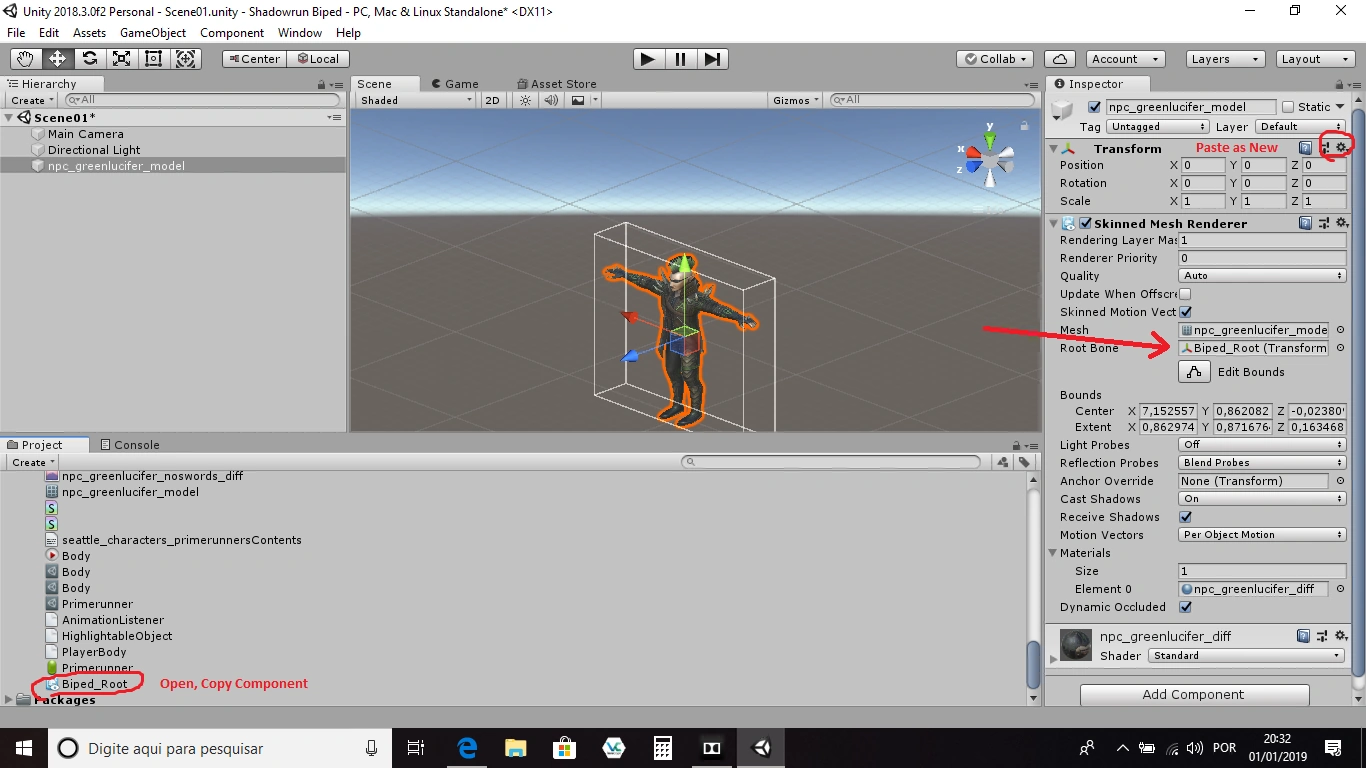
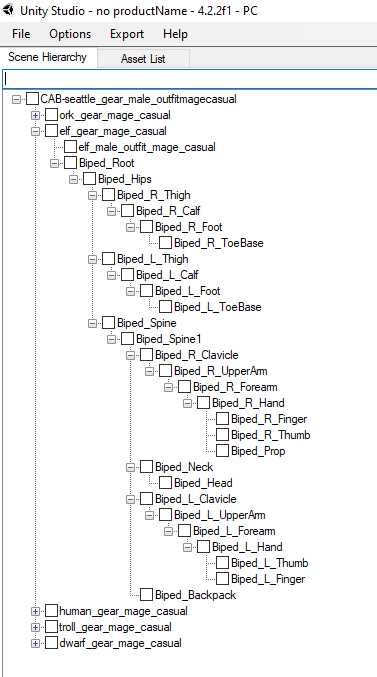
To scale a character up to create a big boss or down to create a miniature (or child / creature young) is fairly simple without editing the mesh itself. You just have to scale the skeleton bones corresponding to the body parts you want to scale. The tricky part is finding the correct transforms in the asset bundle, because they all show as "unnamed asset". The most straightforward scaling for humanoid characters is on the Biped_Root bone, which, as a parent bone, scales the whole character with child skeleton and does not cause any skeleton rigging problems. Likewise, any bone scale affects all children bones. First, to see how your scale is going to look like, export the asset bundle to .asset and Asset->Import Asset with unity. The Primerunner asset bundle is a good practice run because it contains only one character - Green Lucifer. If you're just going to scale the same number on all axes (proportional character scaling), skip to step 2.
1. Previewing the Scale[ | ]
Drag the Green Lucifer mesh to the scene, drag the Green Lucifer Material over it. Find the Biped_Root SkinnedMesh Component in the Primerunner package, copy it and Paste as New Component in the scene character. Set Biped_Root as Root Bone.
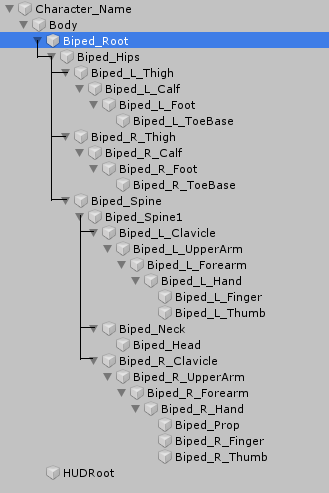
The Biped skeleton hierarchy (the names are important!). Notice the connections from Biped_Hips to the legs and Biped_Spine1 to necks and arms
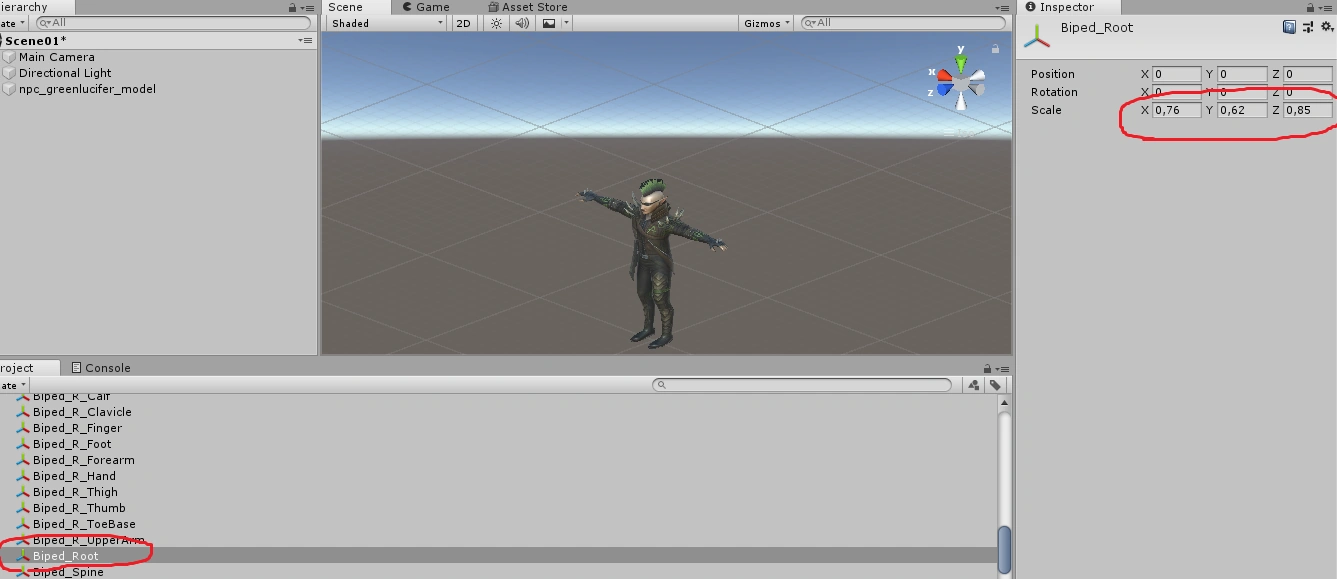
Now look for the bone structure Transform asset(s) you want to scale. Slide the X,Y,Z scales as you like: 2 is double, 0.5 is half. When you think you're ready, write all X,Y,Z scale values down for each bone. Note how scaling a bone scales all children bones. After, for example, scaling up a bone, in order to revert an upscale for all children bones you have to scale down the next child bone in the bone structure. I would avoid messing with translations and rotations.
2. Changing Scale directly in the Bundle[ | ]
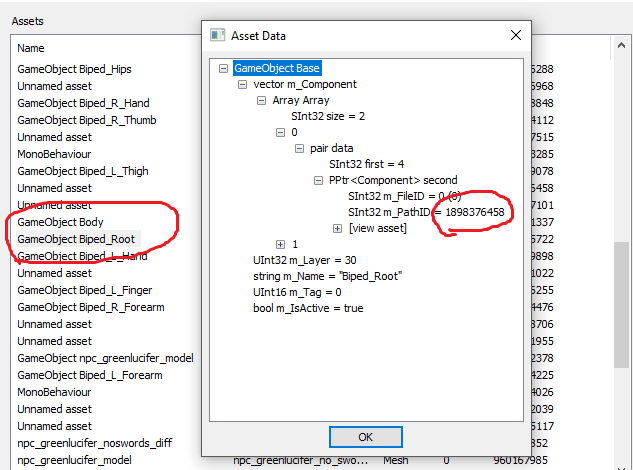
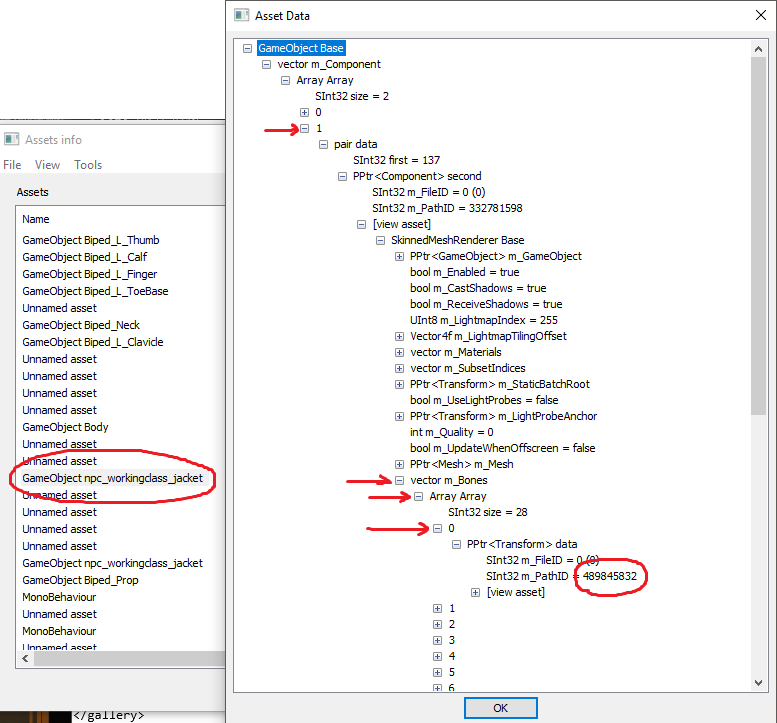
Each bone has one parent and one to many child bones. Each bone has a transform component. After assetbundle packing, transforms will be linked to their parent GameObjects by PathID. First, find which transform is child to GameObject Biped_Root in the greenlucifer container by clicking on the View Data button. Take note of PathID. Order by PathID. Find the transform with that PathID. Export to Dump. Don't close UABE! Open the .txt file, change under Vector3f m_LocalScale the X,Y,Z scale to the values you had written down for that bone. Save txt, Import Dump for that same transform, save assetbundle and voila! If the bone you're looking for is not in the character container and there are many characters in the same bundle also without containers for their bones you may find at least the Root Bone looking for the GameObject Character_Name, click View Data, look for SkinnedMeshRenderer Base, find the root bone transform or bone number 0 in the bone array and that should be the PathID you need.
Finding the corresponding transform component
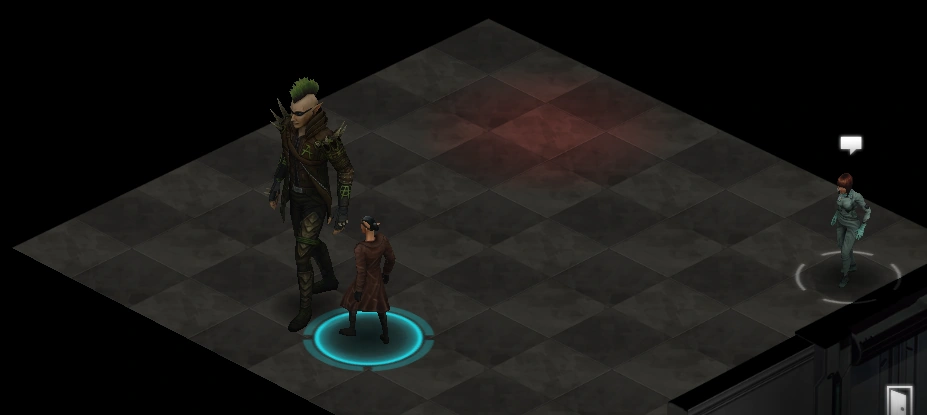
Hello, big guy!
Another way to find the root bone transform
You probably should increase the size of the capsule collider object for your character if you're making a giant. The colliders affect whether an actor can be seen by another and region enter and exit. They don't affect chance-to-hit or things like that. Just dump the Capsule Collider object, edit txt, increase radius (you could see the exact numbers in Unity too by adding a capsule collider to your mesh object and checking the suitable size).
Adding or Replacing Item Prefabs[ | ]
You need to have some 3d modelling skills and Unity to work with meshes themselves. Moreover, replacing meshes will work for item prefabs, but will not work for characters, which is a further topic. Also, I assume you have read the previous sections and learned how to use UABE.
For adding content I strongly recommend working with the Unity Editor version that was used to build the game you wish to mod. You can get the older versions in the Unity Download Archive, and it's free for anyone with the Personal subscription (there's a catch regarding assetbundles though, I'll come to that further on in the sections about adding new content). The versions are:
- Shadowrun Returns - Unity 4.2.2
- Dragonfall - Unity 4.3.4
- Hong Kong- Unity 4.6.2
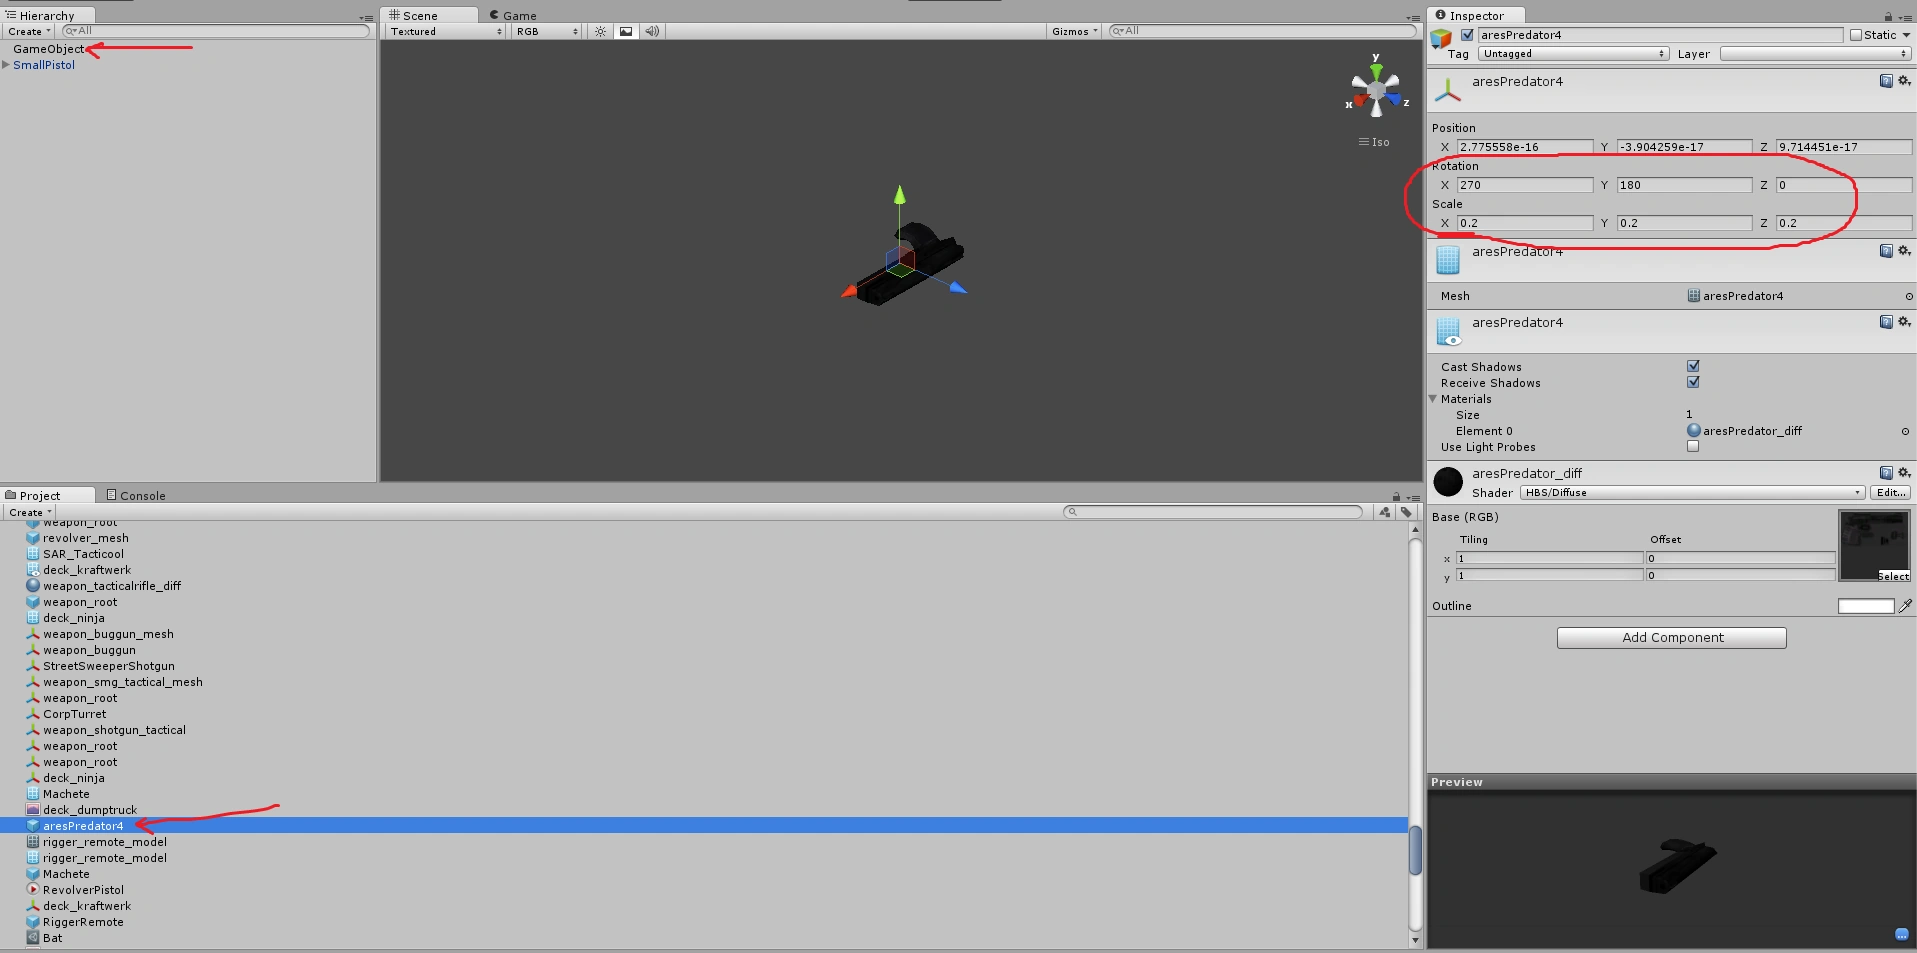
First, you make your model in any software like Blender (there are plenty of tutorials for this). In this example I have made a small pistol compared to the huge Ares Predator prefab used for most pistols that appear in characters' hands. Make a UV-mapped and textured (always use 512 x 512 png) model, export to fbx without cameras, lights, animation or armature and import the new model in Unity Editor. Be attentive to the scale, because fbx usually uses a scale 100 times bigger than Unity (centimetres rather than metres), so you might have to import with 0.01 scale. Don't import animation. Set Rig > Animation Type to None. In the scene compare the size of the mesh with an existing Shadowrun mesh that you can unpack from seattle_items.assetbundle via UABE like shown in the previous sections. Import the texture you made for the UV map and drag it over your mesh and see if it's OK.

Replacing an Item's Mesh[ | ]
For replacing, if it's a sword the mesh needs to have the handle in the same position of the mesh you want to replace. If it's a gun, the grip and muzzle should be more or less in the same position of the original mesh. The muzzle not being in the same spot will result in muzzle flash not coming exactly out of the new model's muzzle, but that's not a big deal.
Have Unity build the "game" for you. Use UABE in the resulting scene0 (if you left the mesh in the scene) or sharedassets0 files and dump export the Mesh component of your model. Open the seattle_items.assetbundle in UABE, select the mesh you wish to replace, dump import your mesh. Select the 2DTexture you need to replace, Plugin > Edit > Load your 512x512 png. Save the new seattle_items.assetbundle, replace the old seattle_items.assetbundle (always backup!) and that should do it.
Adding a New Item Prefab with a New Asset Bundle[ | ]
(Tested for SRR and HK)
Being able to add unlimited new content to the game is pretty much the Holy Grail of a Shadowrun Editor enthusiast. That's possible and not very hard for item prefabs, by putting them inside assetbundle files. However, in older versions of Unity you needed a Unity Pro subscription in order to build assetbundles through a script. Well, the catch is that you need a working Pro Editor just to create assetbundles, and I don't think there's a workaround for this even though the current versions of Unity Personal allow you to build asset bundles for free. Borrow a license from a friend or something. Feel free to try building the assetbundle in a 2017+ version of Unity for free, but I can bet there'll be some compatibility issue. Scripts for building assetbundles can be found in the documentation for script reference Buildpipeline. I used this script to build uncompressed assetbundles with deterministic PathIDs like in Shadowrun. Drop the script inside the Assets/Editor folder to make it work in the Assets menu.
As in the previous section, load your fbx model into an Unity new project. Keep vertex count low, or else you might crash the game. Shadowrun is low-poly.
Import the assets from seattle_items.assetbundle to Unity as in the previous sections.
Create a Game Object with the name of your item. I called my small pistol SmallPistol. Add an empty animation to it. Then create a C# script asset called HighlightableObject (everything is case-sensitive, so be careful). Assign a monobehaviour component to your object with the script HighlightableObject (drag the script over the object). Don't worry about the script content itself, just its name is important for now. Create a child object, it can be called Small_Pistol_mesh. Drop your mesh over this object. It will create a mesh filter and a rendered mesh component. Drop the UV map texture you created on it. It's better to use the standard shader, and you can drag some sliders to make the object more metallic or shiny if you want.
Now, since it's a pistol, find the AresPredator4 object that has the rendered mesh components. Create a new empty object in the scene and paste all these components on it (dragging to the scene won't work because the Ares Predator prefab is broken). Look at its size and rotation. The new small pistol must have the same proportions and orientation as the Ares Predator. So, rotate and scale the new gun as necessary. When it's done remove the Ares Predator object from the scene.
For guns, create two more empty objects, children to the main object; weapon_root and weapon_muzzle. Melee items don't have muzzles, so... weapon_root must be where the character will grip it with the right hand, whereas weapon_muzzle is where the game engine will place the muzzle flash when fired.
When done, drag the main object from the scene to the Project window and it will be saved as prefab (become blue). You can remove all the broken assets from seattle_items from the project too. Select your prefab and go to menu Assets > Build assetbundle. Remember you need both the editor script that builds asset bundles and a Pro license.
Open your modname_items.assetbundle file with UABE. Replace the HighlightableObject Monoscript with the HighlightableObject text dump from any other SRR character or item assetbundle. The important bit (for SRR) is that it'll have the line UInt32 m_PropertiesHash = 3033599902. Save the resulting modname_items.assetbundle in a folder called Modname (or the name of a city just to preserve tradition) next to Seattle (or Berlin or HongKong) in the \Shadowrun_Data\StreamingAssets\standalone\ folder.
Now, in order to use your model you must assign it to a custom item in the data/items/ folder of your campaign Content Pack. I created a Glock19 (pi 1 glock19.item.txt) but I could just as well have replaced the Fichetti Security, Colt Manhunter or any other pistol smaller than the Ares Predator. Assign your prefab by name preceded by the new standalone folder name and a colon (ex: equipPrefabName: "David:SmallPistol"). When using your item in the story the model should appear.
Copy and paste the broken components into a new game object
Compare how your item will look next to the game prefab
The parent object must have the empty animation and the Monobehaviour with HighlightableObject. The weapon_root is the grip. Guns must have a weapon_muzzle child empty object too.
Build assetbundle with your prefab(s) and the text file containing the prefab names
Yeah, I wasn't feeling very imaginative about the folder and assetbundle name
In order to see your model you must assign the prefab to an item data

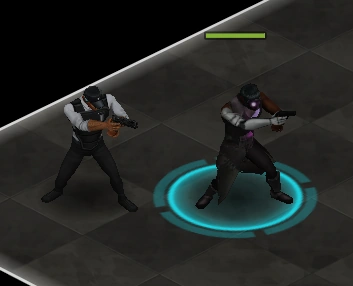 New item prefab delivered in gameplay! Compare it to the Predator on the left.
Adding Character Prefabs[ | ]
Legacy Method (Bipeds)[ | ]
There's no way to replace a character mesh in UABE keeping the same bone-to-vertex relation, because any new baked mesh will have all vertices re-indexed. The result will be a complete blob mess. The only way is to add a new assetbundle with your characters. You can add the bundle in the Seattle folder or create your own folder.
First, you need to model your character and UV-Map it with a 512x512 png texture. There are plenty of tutorials around for you to master this. Again, keep vertex count to a minimum. I joined all submeshes into one and painted a single texture for all their UV maps.
Then, you must rig the character. There's a catch though: bone position, alignment and names must follow a very strict pattern, or else the character will float all twisted in-game when animated as Biped. Blender, for instance, always exports bone position with the local y axis along the bone, and that'll make your traditionally rigged thigh and calf bones point downwards, whereas the SRR models in unity have their thigh bone local transforms pointing up and calf bones pointing backwards! For a matter of expedience I'm sharing the biped skeleton in Blender format. A t-pose model exported (via fbx Export from Unity or unbundle then extract from Disunity for example) from Shadowrun into Blender will automatically be aligned with this armature, but you might need to do some scaling and moving. Biped_Prop is supposed to be on the palm of the right hand. The important part is NOT rotating the bones in Edit mode. Due to the fact that bones are aligned in such an odd way for Blender, "Armature Parenting With Automatic Weights" might not work properly! That means that after parenting you'll have to weight-paint the mesh for each bone. Test posing each bone to check if strange things are happening to your vertices. Biped_Root and Biped_Prop are not to deform anything! Props as separate objects are useful if you're going to assign different materials to them. Otherwise, weight-paint and join all meshes into one.
Also I strongly recommend thoroughly weight-painting the core male and female models (for all metahuman races that you're going to need new models for, at least) until the muscles work in a natural way in-game and saving them unaltered so you can use them later.
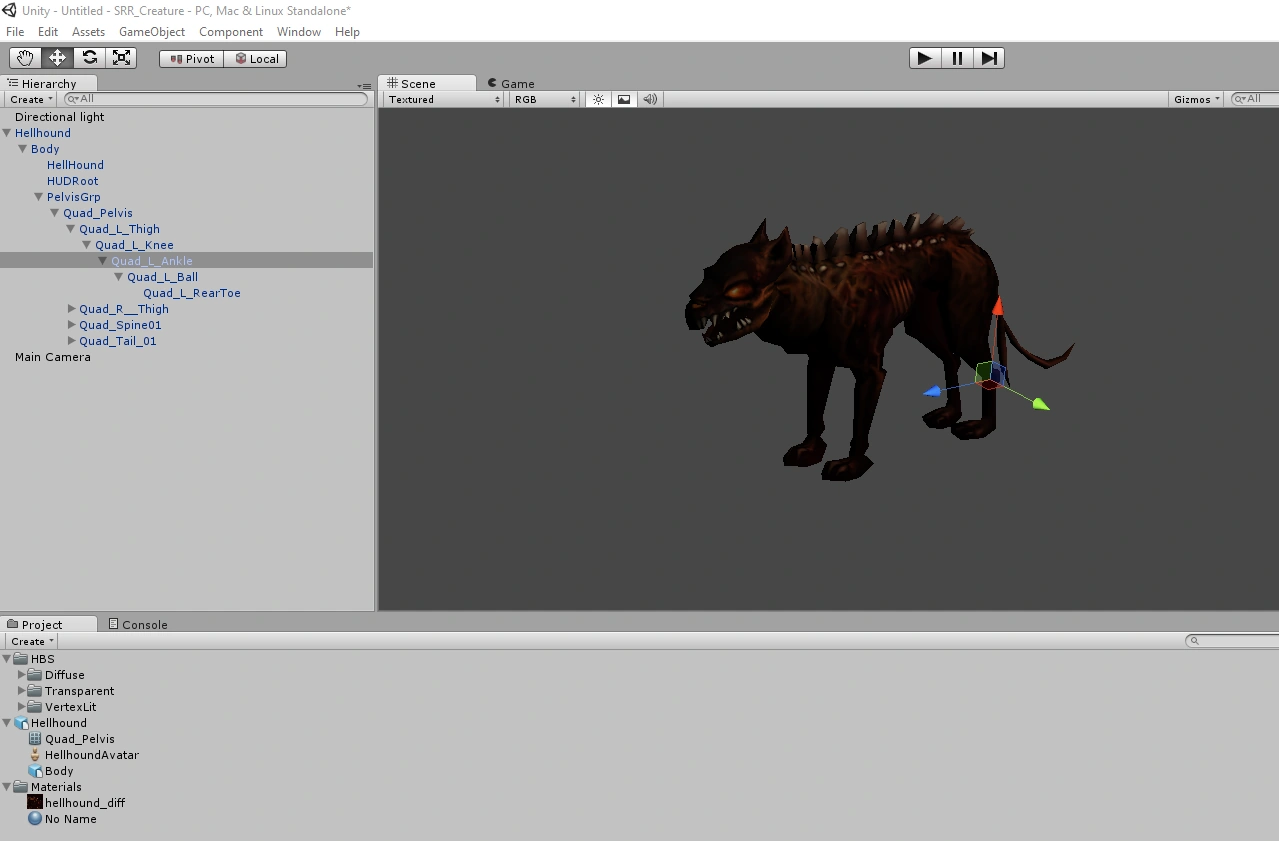
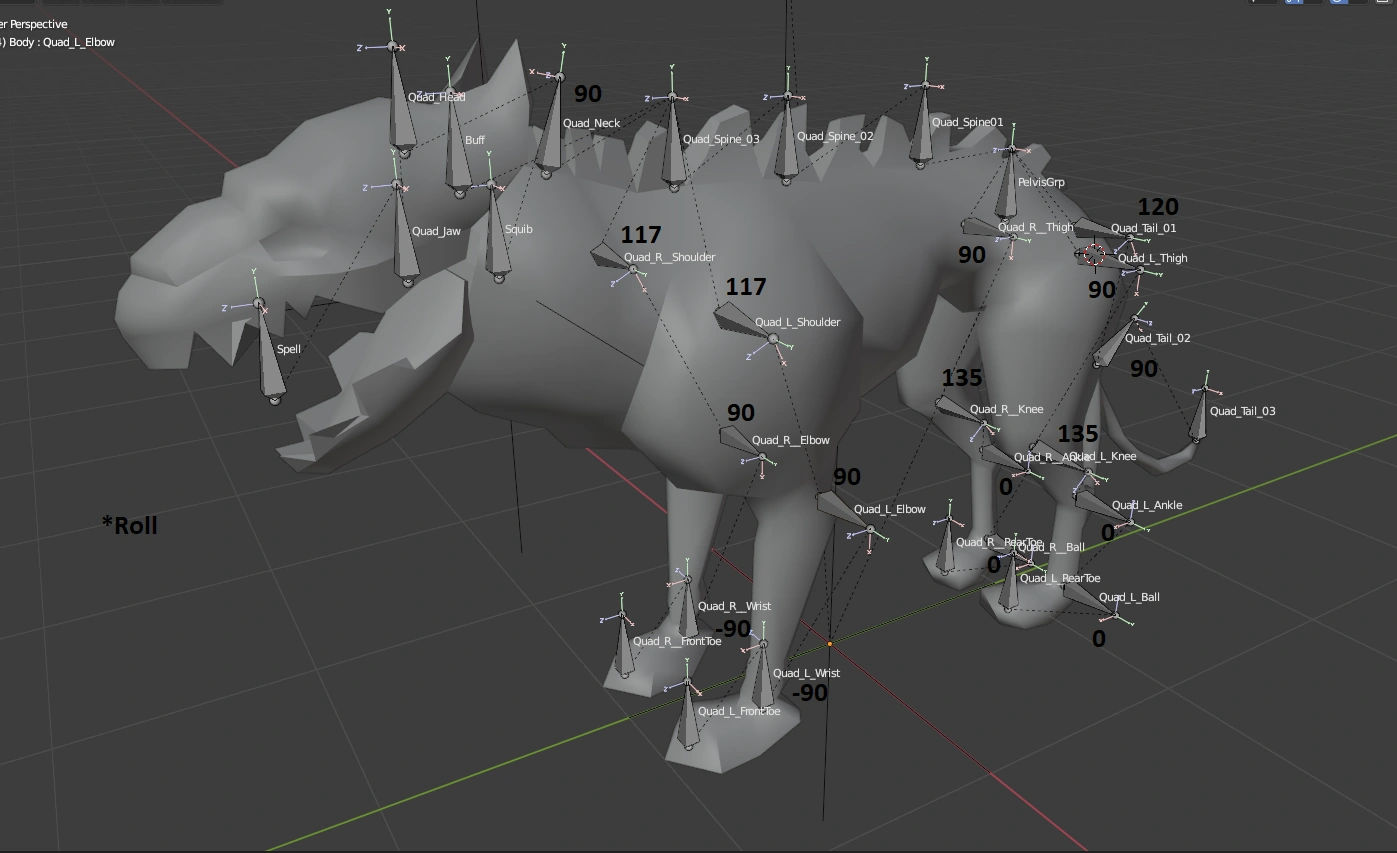
Quadrupeds (Quad)[ | ]
The SRR-compatible skeleton for quads is in this file. The mesh used was the Hellhound.
New Method (Unity Studio; any bone structure supported by the game)[ | ]
If you're just going to modify an existing Shadowrun Returns model, just export to fbx using Unity Studio and you already have all the bone structure with it. If you're going to mess with the textures only, you could proceed straight to importing this fbx file into Unity. If you're going to modify the mesh, use the Autodesk app to convert ASCII fbx to binary fbx and open it into your preferred 3D modelling application.
As of Blender version 3.6+ , Blender is correctly importing armatures from Shadowrun Returns and Mixamo, which hadn't been the case in Blender 2.x or older versions. I recommend scaling X,Y and Z up to 1.0 to make the model more workable in Blender, since default scale for fbx importing is 0.01.

You could still delete the whole mesh and create a new one from scratch or use stock meshes from the web, but do keep the skeleton structure in the scene (biped or quad). Then you'll have to weight paint the mesh for each bone just like in the Old Method.
Setting up the Model in Unity[ | ]
Then export the mesh to fbx. I scaled down to 0.01 in the export already. For armatures, deform bones only.
Exporting from Blender to fbx
When importing the fbx to Unity, if you had already scaled the mesh down on export you won't need to scale down on import, keeping the import scale 1. Import Materials based on texture name. On Rig tab, just keep animation "Generic" and no need to assign the Root Bone. On Animation tab, don't import any animation. Import the png you used for UV-Mapping. I saved two Harebrained Schemes Shaders from imported SRR assetbundles in the folder structure HBS/Transparent/Cutout/Diffuse and HBS/Transparent/Cutout/VertexLit. To do that just open a compiled shader in Monodevelop and save a copy in these folders. Drag your imported model to the scene. Parent to Biped_Root must be Body, and parent to Body must be your main prefab object. Keep rotation and position of the main object at 0. Rename the main object to the name you want the prefab to have and remember this is going to be case-sensitive later! Create an empty object and call it HUDRoot. Drag it over "Body" so that it becomes child. Position the transform at about Y 1.90. That's where the interaction icons like the conversation balloon will appear. Undressable prefabs in order to carry a backpack object (cyberdeck) will also need a Biped_Backpack object on their backs, child to Spine1.
 Cutout Shaders are useful for pieces like this mohawk.
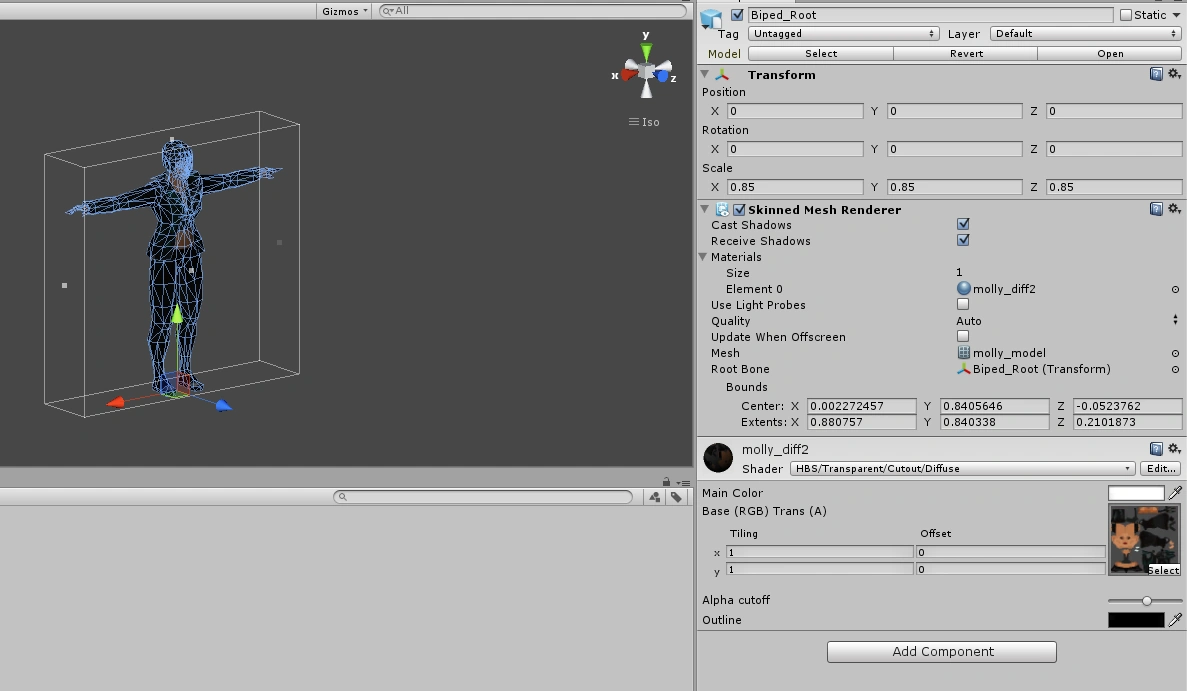
Delete the Animation Controller component. Copy the Skinned Mesh Renderer component to Biped_Root, use the HBS/Transparent/Cutout/Diffuse shader with your texture on it and then delete any other object in the scene that had the mesh assigned to it. Assign an empty Miscellaneous>Animation component to Body, uncheck Play Automatically and set Culling Type "Based On Renderers". Assign a Physics>Capsule Collider component to the main object roughly the size of your character disregarding the extended arms. I used center Y 0.73, radius 0.27 and height 1.47.
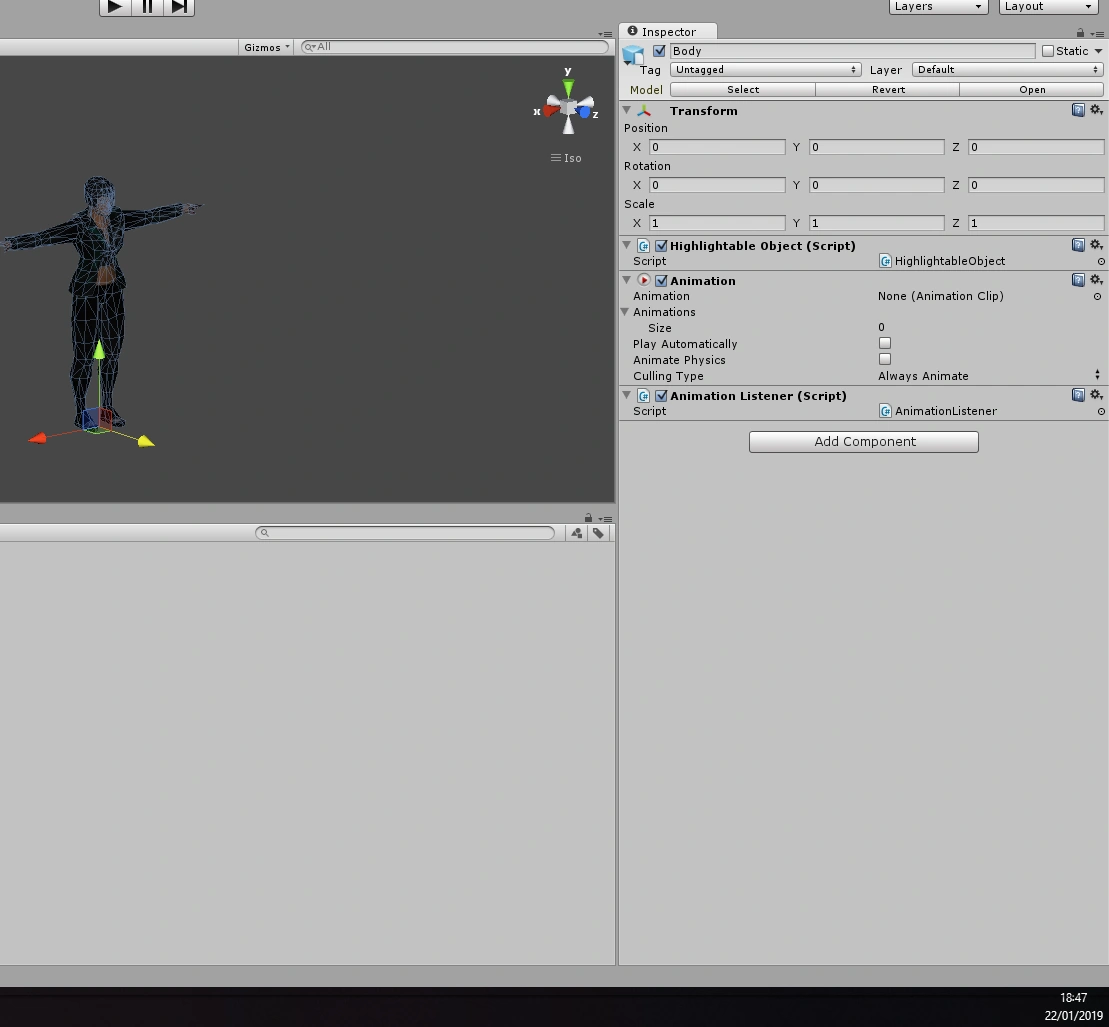
Then you must have 3 C# scripts in your Assets. They must be called (case-sensitive!) AnimationListener, HighlightableObject and PlayerBody. All except PlayerBody will have the default Monobehaviour class inherit and need nothing else (that means just create the script, name it and leave it). PlayerBody, on the other hand, will input to the game a bunch of variables regarding your character. Don't worry about the original scripts in the game, only the input to PlayerBody is important now. I created a faux PlayerBody script and you can get it here. Use this code for PlayerBody and compile it. Drag HighlightableObject and AnimationListener over Body. Drag PlayerBody over the main object. A big variable input list will appear in the inspection window.
Inspection of the Main Object
Inspection of the Body Object
Inspection of the Biped_Root Object
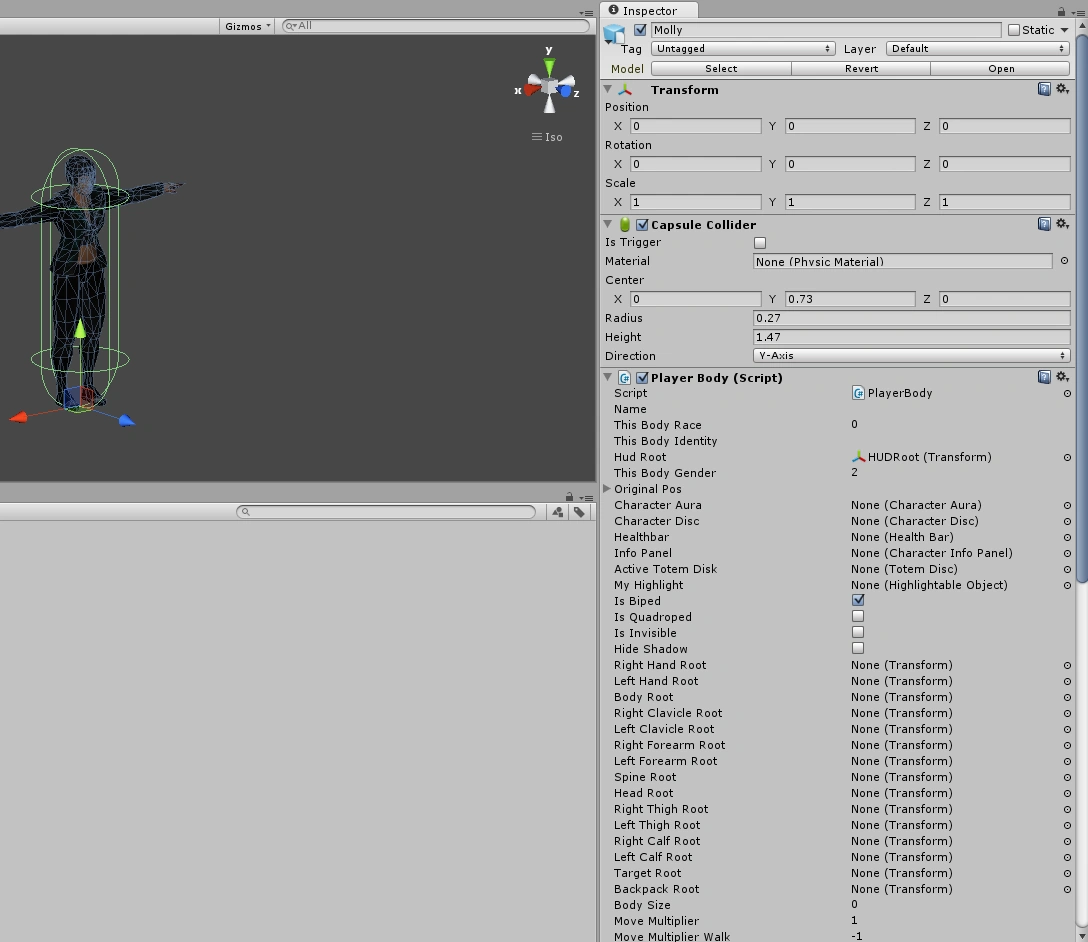
Configuring the PlayerBody Monobehaviour[ | ]
Most of PlayerBody's input is left empty, especially for non-core characters. You need to tell the game that your prefab is male or female and what is its race. The default for the game when there's no data is human male, so the character will make male sounds for pain and death, for example. Click on Hud Root input button and select the HUDRoot Transform in the Scene. Click on Backpack Root input button and select the Biped_Backpack Transform in the Scene.The original PlayerBody script had a drop-down menu for public enum Gender and Race defined in the "Player" class that returned an integer. I dropped that; just input the numbers for This Body Race and Gender according to the tables:
| Race | Number |
|---|---|
| Human | 0 |
| Dwarf | 1 |
| Elf | 2 |
| Ork | 3 |
| Troll | 4 |
| Dragon | 5 |
| Ghoul | 6 |
| Spirit | 7 |
| Drone | 8 |
| Object | 9 |
| Creature | 10 |
| Bug | 11 |
| Freespirit | 12 |
| Freedrone | 13 |
Freespirits and Freedrones don't need to be set independent via the Editor in order to exist in a scene without a master shaman / rigger. No "Dragon" characters were made for SRR/DMS, but there is one in Dragonfall.
| Gender | Number |
|---|---|
| None | 0 |
| Male | 1 |
| Female | 2 |
If your character is a biped, like all metahumans, check the Is Biped box. Other default values for humans are:
| Variable | Default |
|---|---|
| Body Size | 0 |
| Move Multiplier | 1.1 |
| Move Multiplier Walk | -1 |
| Move Multiplier Sprint | -1 |
| Dead Wait Time | 4 |
| Dead Fade Time | 3 |
| On Death Fx | DeathAction |
Move Multiplier will make your character move faster or slower in the animations (it does not affect the move speed stat, which means how many squares your character moves per AP ). That might make the walk and run animations look more realistic when your character has bigger or smaller legs. It's usually 1 for dwarves and elves, 1.1 for humans, 1.05 for orks and 1.2 for trolls. In any case tweak it if your character seems to be "ice skating" when he walks. Dead Wait Time and Dead Fade Time are in seconds. That's overridden if you set actor body to persist. Body Size is set to 0 for humans, dwarves, elves and orks, while trolls are set to 1.3. Death FX is DeathAction for metahumans and DroneDeathAction for drones and for creatures' death fx is usually ruled by ThisBodyIdentity. Always check what's the This Body Identity and On death FX for the type of character you're creating.
If your character is a quadruped, check IsQuad, uncheck IsBiped. Then, since all quadrupeds are creatures, Race = 10 and ThisBodyIdentity will rule its animations and sounds.
Building the Assetbundle and turning the prefab playable[ | ]
With everything set, drag the Main Object from the scene to the Project window. That will create the prefab. Select the character prefab(s), select build assetbundle (remember you need the assetbundle Editor script and, for Unity 4.x, a Pro subscription).

Drop your assetbundle in the standalone/Seattle folder if it's seattle_characters_xxxxx or in your new standalone/Folder if it's named like folder_characters_xxxxx.
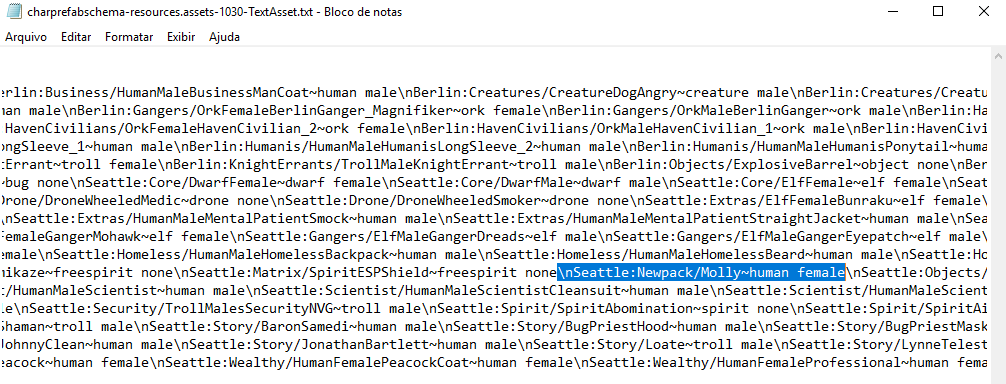
Open resources.asset in Shadowrun_Data. Export dump the charprefabschema Text asset. Leave UABE open. Open the text dump in Notepad with no line breaks! If you break a line or add a space character it will break the whole file! Insert your new prefab name following the same logic of the other ones:
Save and import dump over charprefabschema in UABE. Save, but remember resources.asset is 613M big! Create an executable mod with UABE. That way all you supply to the player is a tiny exe file plus your assetbundles in a zip, not a 613M file just to add a couple dozen bytes in charprefabschema!
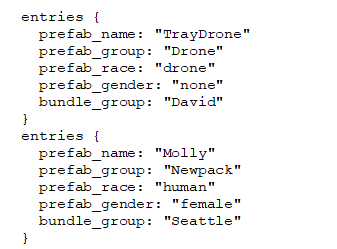
Finally, in your Content Pack create the data/misc folder. Create a txt called YourContentPackName.pflib.txt. Create entries for all your characters following this logic:
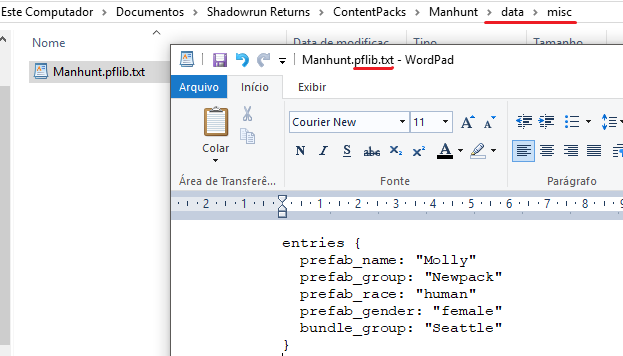
You can refer to dead_man_switch.pflib.txt in the Dead_man_switch Content Pack data/misc folder (saved as source via Editor) to see how it's done.
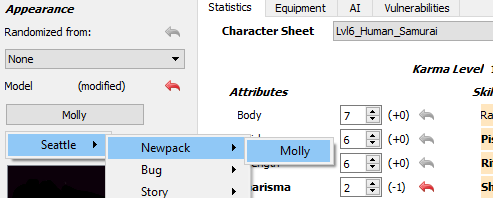
There! Your prefab will show in the Editor as soon as it refreshes the content pack data. I'm sharing the resulting Unity 4.2.2 project with Molly's prefab so you can save your time and get the hang of the entire process.
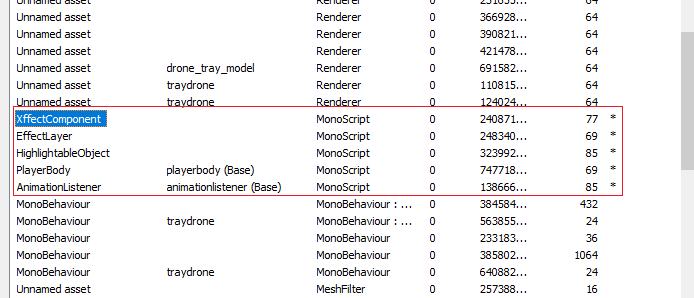
Adding New Drones as Prefabs and assigning them to Drone Items[ | ]
The process for new drone prefabs, including matrix drones (ICs with no limbs) is pretty much the same as for biped characters, with the upside that there's no skeleton to rig this time. Create the drone model and UV-map it. When exporting to fbx, no need to export armature or animation. Import model to Unity and compare its size to the other drone meshes from the seattle_characters_drone assetbundle, just as for any other weapon item.
Then, the drone prefab structure is a mix between character and weapon. It has parts like hatch and weapon muzzle, but they're all children to Drone_Root and drone animations animate Drone_Root only. (This is for SRR. Hover drones in SRHK have rotating parts, so I haven't checked them yet). The hovering drones will be lifted from the ground by the animation, so keep their models grounded at 0,0,0. For hovering drones that emit particle smoke there is a particular child to Drone_Root called droneHover_Xffect with its child objects xftmesh vfx_hover and EffectLayer. For the particle sprites to work two extra scripts are needed: XffectComponent and EffectLayer.
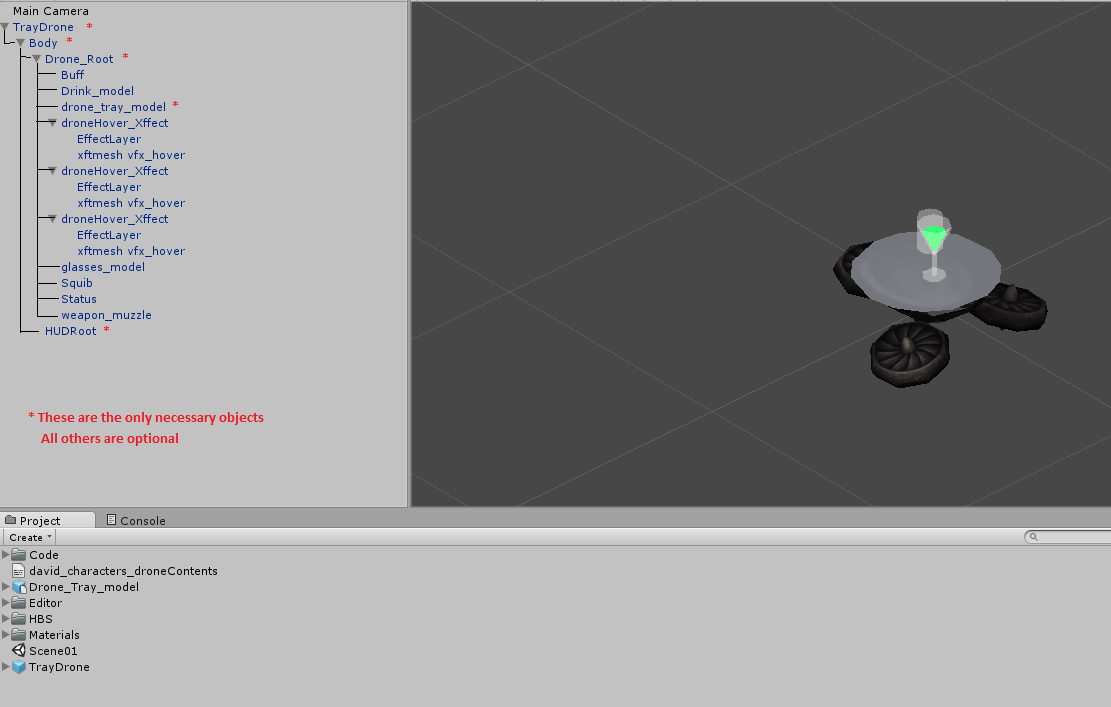
The only actually required objects are the main object DronePrefabName, Body, HUDRoot, Drone_Root and your drone model, child to Drone_Root. Objects like Hatch and weapon_muzzle are just to spawn muzzle flash or bombs correctly when available, and the droneHover_Xffect is for smoky rotor looks. You can have one droneHover_Xffect per rotor by just duplicating the object and centering it on each rotor. The XffectComponent and EffectLayer scripts are available in the Unity project I'm sharing.
The PlayerBody script now has race 8 (drone) and gender 0 (none). Death FX is now DroneDeathAction and the new thing is that now This Body Identity is going to rule whether the drone is going to be animated and sound as wheeled, matrix, jet or hovering.
| Type of drone/vehicle/object animation and sounds | Race | This Body Identity |
|---|---|---|
| Wheeled | 8 | WHEELED |
| Matrix | 8 | MATRIX |
| Hovering | 8 | FLIGHT |
| Jet | 8 | JET |
| Auto Turret | 9 | MILTURRET |
| Corp Turret | 9 | CORPTURRET |
| HKPD Turret (HK) | 9 | TURRET |
| Koschei-like (HK) | 8 | KOSCHEI |
| Spidertank-like (HK) | 8 | SPIDER |
As for characters, build the assetbundle with the prefabs. A new folder other than Seattle is recommended, so build it as foldername_characters_drone.assetbundle. Open the bundle with UABE, replace the Monoscripts AnimationListener, HighlightableObject, PlayerBody, XffectComponent and EffectLayer by text dumps from seattle_characters_drone.assetbundle. I recommend keeping the BuildPipeline script with DeterministicAssetBundle to keep PathIDs always the same and making an UABE executable for this, so you won't have to repeat this operation as you re-build your assetbundle again and again. (But remember the UABE executable is going to work only for this assetbundle).
Drop the assetbundle in the standalone/Foldername folder (I used "David" as usual). Copy seattle_animations.assetbundle and drop it in your Foldername. Rename it as foldername_animations.assetbundle. When you use prefabs in your custom folder the game will look for animation assetbundles in this folder, not in Seattle anymore. However, inside the animations assetbundle is an animation library that refers back to all animations in the Seattle folder. You can simply copy and rename the seattle_animations assetbundle if you're not going to need any new animations. If you're going to create new animations you'll need to mess with the animation library. More on this in the further animation section.
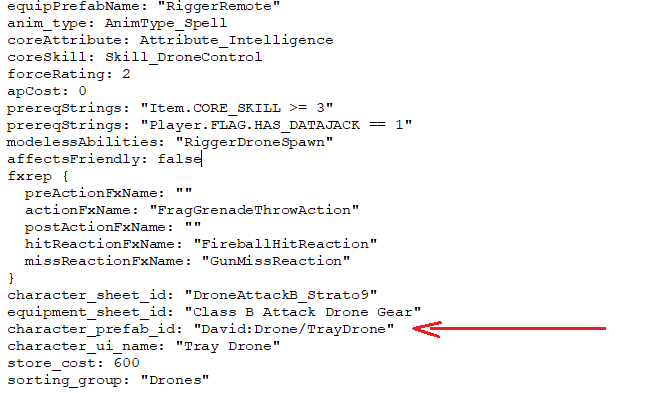
Insert your drone prefab in the charprefabschema text dump and save resources.assets. Insert the new drone character in your data\misc\CampaignName.pflib.txt like in the previous section (this time bundle_group is not going to be Seattle anymore). Finally, you can add a new drone item to be equipped or sold by merchants by adding to the \data\items folder and refer to your prefab in character_prefab_id. It must follow the schema "Foldername:Drone/PrefabName". Drone in this case, is just the prefab group, which is whatever comes after foldername_characters_. Load the Editor and your new drone will be ready for use in the campaign.
Replace monoscripts
The new standalone folder should have animation bundles
Adding the drone to the charprefabschema dump
Adding to your content pack's pflib.txt
Using prefab in a drone item
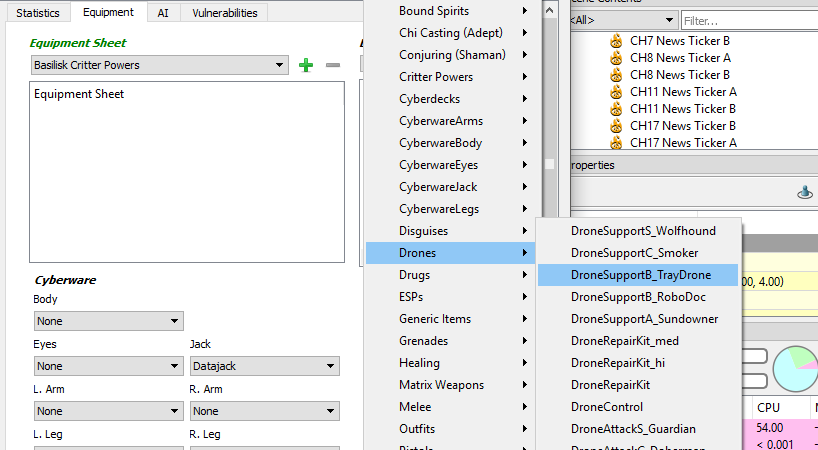
Equip drone to a rigger with datajack (according to item sheet)
Drone in-game with particles
A car as a 3D actor, behaves as wheeled drone. It doesn't need to move, depending on intended purposes for this scene.
Here's the Unity project for SRR Drones.
Adding new Core Outfits[ | ]
Works for SRR only. DFDC and HK have incorporated outfit bundle assets to resources.assets. That means you can only replace textures in the resources.assets file and any changes made to the standalone Seattle folder are ineffective. DFDC and HK don't seem to recognize new standalone folders, which is no trouble with SRR. Also, due to the sheer file size of resources.assets in DFDC and HK an executable file should definitely be created with UABE.
The Basics[ | ]
Core outfits are outfits that fit core prefab actors, who show naked if they don't have an outfit item in their inventory. An outfit prefab must be assigned to an item in order to be used in the game, either via inventory or the hiring data folder. Disguises are also items but are available through the Scene's Social tab. An item sheet references the gear bundle, the outfit texture and the gear prefab. The gear bundle is an assetbundle named like
<bundlegroup>_gear_<male/female>_<disguise/outfit><name>.assetbundle
where bundlegroup by default is seattle in the Seattle folder, but you can also have Berlin or your own folder.
The outfit texture is the part of the outfit that is "painted" directly over the core prefab's skin. Consider it like body art. The Corporate Salaryman outfit item contains only outfit texture, so it appears very tight. The transparent color is key here: the core prefab skin will be replaced by the outfit texture only where the outfit texture is not in the transparent color.
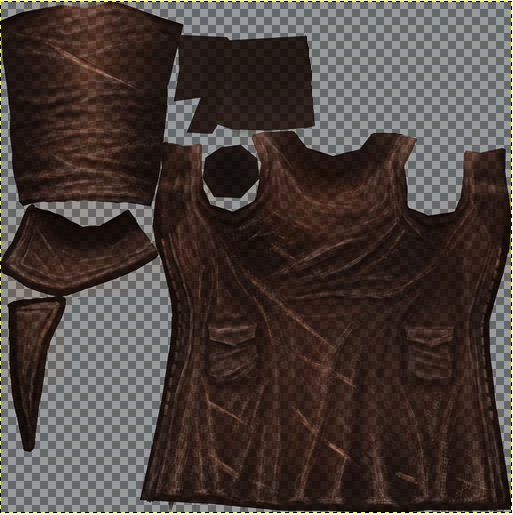
The gear prefab are all parts of the outfit that are "bulky" or appendages, and have got their own rigged 3D mesh and texture. These are trenchcoats, hats, robes, hoods, skirts, nightvison goggles etc. Also, their shader is double-sided, so a skirt or trenchcoat face will have both normal and anti-normal sides rendered.
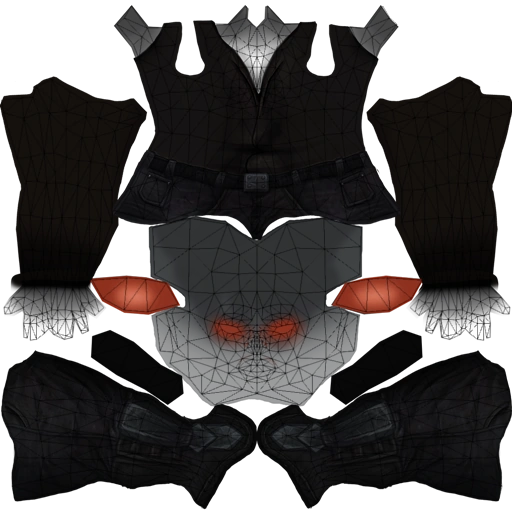
This outfit contains only outfit texture, the part that is painted directly over the body
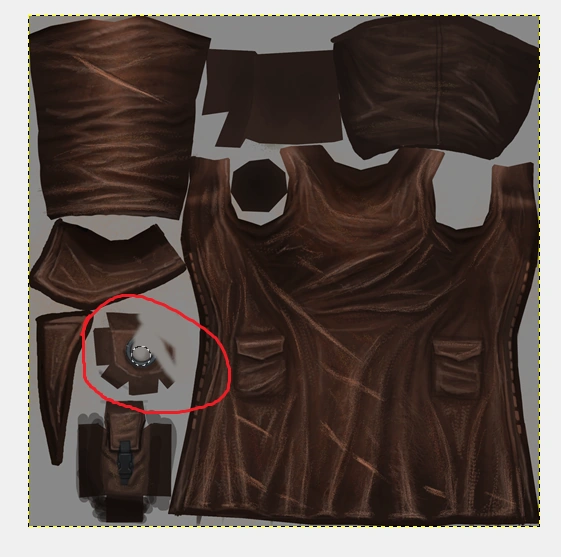
The gear prefab in this outfit includes the robes, hood and pouch. Shirt, pants and boots are outfit texture. Credit: DaveofDeath
Easy Solution: inter-bundle texture mixing[ | ]
Pros: No artistic skills needed, doesn't need Unity
Cons: Limited to vanilla textures, no way to add or reshape 3D gear
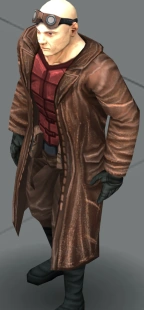
Copy the outfit assetbundles, male and female, from Seattle to your custom folder under Shadowrun_Data\StreamingAssets\standalone\. I copied the Samurai TrenchcoatAlt ones and renamed them david_gear_female_outfitbountyrunner.assetbundle and david_gear_male_outfitbountyrunner.assetbundle. Let's say I want a shirt and tie under the trenchcoat instead of that purple ballistic vest. I can use the shirt, pants and tie from other outfit like Corporate Salaryman.
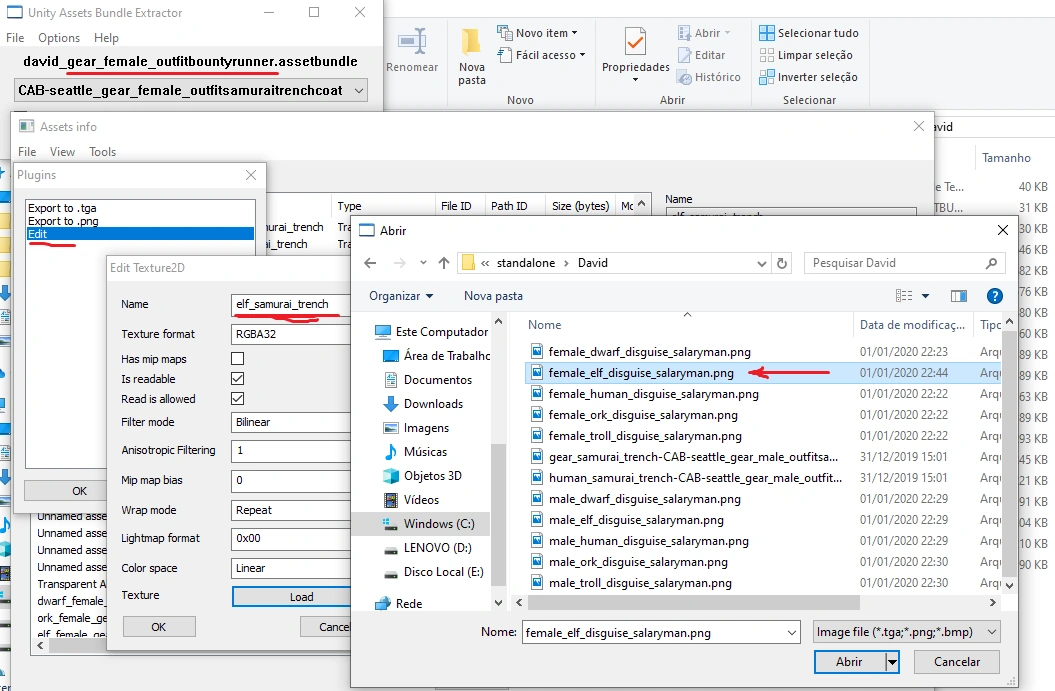
Open the assetbundle of the desired texture you want for the outfit texture in UABE. I open seattle_gear_female_disguisesalaryman and seattle_gear_male_disguisesalaryman, click Info, sort by type to find Texture 2D assets. Plugin Export to .png for all 5 races (human, ork, dwarf, elf, troll), male and female bundles. That's a total of 10 textures. Don't forget to add male or female to the file names to avoid mistakes later.
Now open the assetbundle copies you had renamed on step one in UABE, click Info. Sort by type to find Texture 2D assets. Select texture by race, Plugin Edit, Load, select the appropriate gender and race texture you got from step 2, click OK. Do it for all 5 races, save changes, overwrite assetbundle (you have to rename, just add 00 to the extension delete the old one, rename the new one by removing 00 from extension), repeat for the other gender assetbundle. Leave the gear texture untouched for now. That's the trenchcoat.
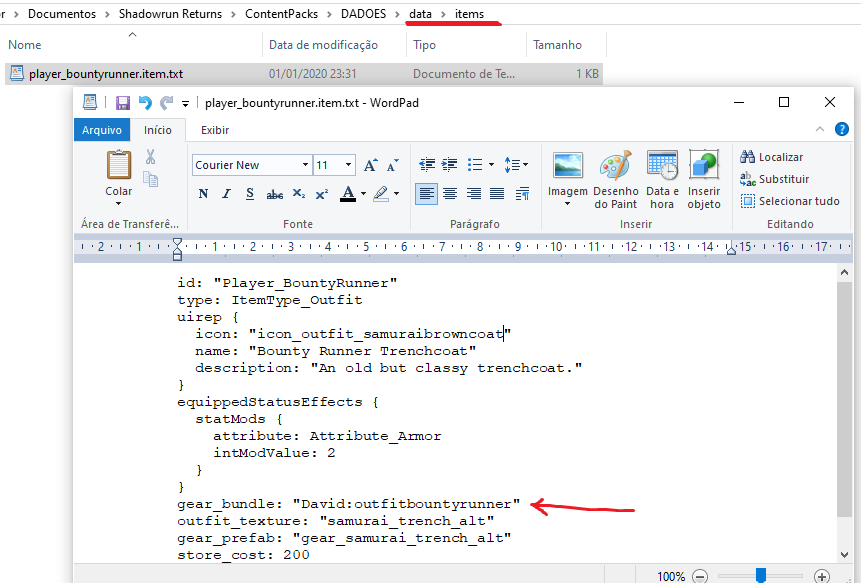
Now you must create the outfit item. Copy the original item text file you need from the Seattle/data/items and rename it to the new item under data/items folder in your Content Pack. (You should have an uncooked Seattle Content Pack that contains txt files rather than byte files. Saves a lot of effort to modify items.) Change the gear bundle referencein the new item to "<your bundle group>:outfit<name>". My example: gear_bundle: "David:outfitbountyrunner". Change the item id, armor modifier, cost and descriptions as you see fit. (you must create a new item id)
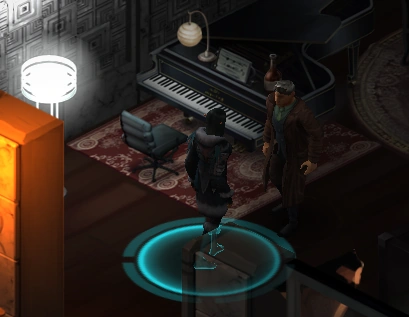
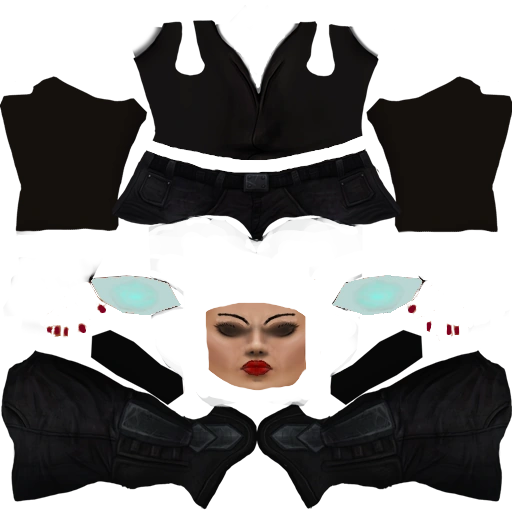
Done. The outfit texture is now a suit. Just add the item to a core prefab actor's inventory. Hmm, those silly goggles are still on his forehead, even though the new outfit texture erased the goggle rubber band from the head. With a simple brush I can get rid of them (next section). I also have to erase the thighs, which were designed to be fatter than the pants.
This outfit will be the new outfit texture
And this oufit will be modified with the new outfit texture
Switching textures in UABE
Creating a new outfit item sheet
The new outfit combination in-game
Harder Solution: texture painting[ | ]
Pros: Lots of freedom, can remove or crop 3D gear without artistic skills, doesn't need Unity
Cons: Some artistic skills needed to create brand new looks, no way to add or reshape 3D gear, needs to modify 10 or 12 textures
If you can't delete a mesh from the gear prefab, you can make it invisible! I'll paint those goggles with the background color and make it transparent. Use the same method above to get the gear textures and paint it in your preferred painting software. Turn the background color into alpha to make it transparent (the shader will use alpha as transparency). Use UABE to replace the gear textures. You can use this transparency method to get rid of appendages, crop clothes and make holes in them.
Paint with background color to erase unwanted parts
Then turn background color into alpha
The final result after making parts of the gear prefab invisible
By turning Feuerschwinge's shackles and cord textures completely transparent the dragon model is unshackled
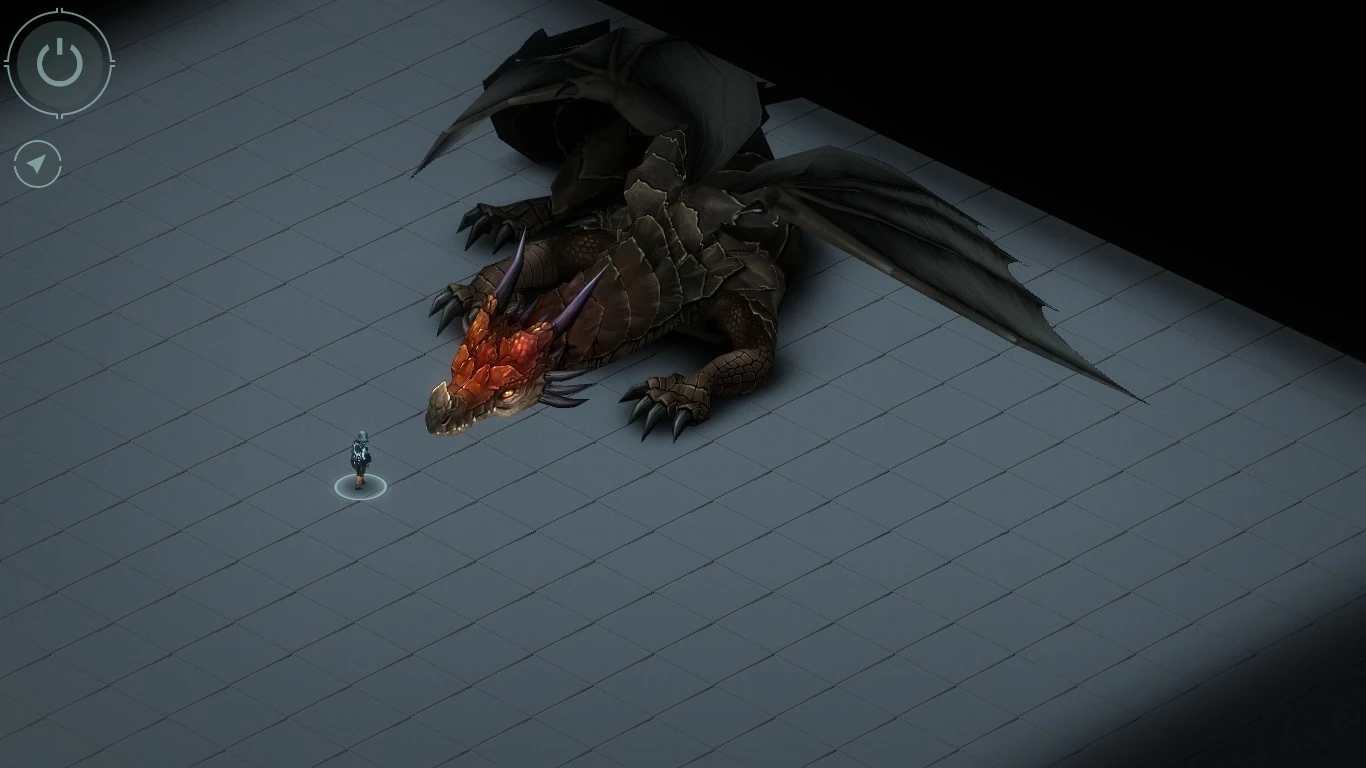
Here's the "Unshackle the Dragon Model" mod executable. Must be run in the Dragonfall Data folder.
If, aside from making parts invisible, you intend to re-paint the outfit texture or gear texture, remember you are likely to adapt an outfit texture to 10 different outfit textures and (maybe) a gear texture for 2 genders. That is, if you need the outfit to be a Player outfit. A nice loophole for creating original NPCs that look great without 3D modelling, rigging, Unity or building assetbundles is to create a unique outfit that fits just the race and gender of your NPC.
Unique NPCs from Unique Outfits[ | ]
It's quite likely that you have in mind an NPC belonging to one of the 5 main metahuman races and with a standard body shape. If the vanilla hair and beard shapes and colors are enough to create the base character's head, you can create an outfit using the previous sections' steps for just his/her race and gender. That saves work from 11 other outfit textures for the other races and gender. Just copy the outfit assetbundle from the gender you need and replace the outfit texture of the race you need.
That way you can create unique
- Tattoos
- Skin colors
- Eye colors
- Cyberware like odd eyeware, datajacks, different colors for cyberlimbs or a plastic face
To create new skin colors, eyes, eyebrows, and other 2D facial features you'll need to copy parts from the naked core body textures in seattle_characterbase_<race>_<gender> and paste them on the outfit texture. In fact, you need those characterbase textures as a reference to build outfit textures from scratch or creating tattoos (to position them correctly). An additional tool is using Blender's UV Editing mode, UV Menu → Export UV Layout.
The Mage Dark human female outfit texture with human female UV Layout on top as reference
The Mage Dark outfit modified as the new Molly outfit
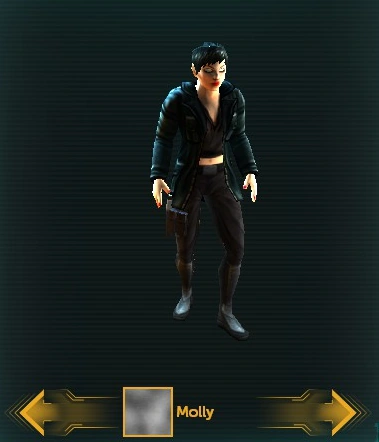
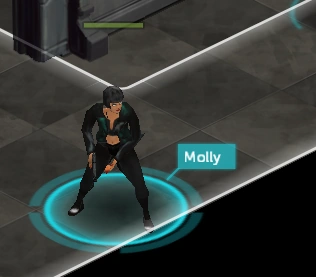
Molly's new version is just a Samurai Starter outfit with the modified Mage Dark outfit texture on a s6h6c4 human female.
Hardest Solution: rigging[ | ]
Pros: Total freedom Cons: Needs to create assetbundle in Unity, outfits must be tested for all races
Absolutely do use Unity Studio for this. Opening an existing outfit and modifying its gear mesh in Blender and not touching any of its 5 skeletons is what I recommend.
The gear prefab will have to conform to all metahuman races. A complete set of biped bone objects must be present for all 5 races for the male bundle and all 5 races for the female bundle. Each set must have its bone objects scaled to fit all the races. At least hats and hair are easy to add, because they are just children to the head object and don't need a skinned mesh renderer component. For the rest of the malleable gear, I don't recommend getting too imaginative, just cut and crop meshes from outfits that already exist and don't mess around with the bone structure or do any mesh scaling, because that will likely make the outfit not conform well to all races.
Any outfit with gear prefab will have this structure for both male and female bundles. Elf was expanded here to show it's a complete biped skeleton for every race.
Adding Animations[ | ]
Once you have a working character in Unity you can create animations for him and all characters of his skeleton schema (biped, quadroped etc) using the Unity Animation tool only. First drag a character prefab to the scene and break the prefab instance (GameObject menu). Then, the AnimationListener script that we had been using should be slightly modified to work with Events. Just add a function called OnAnimEvent that takes a string input:
public void OnAnimEvent(string animEvent) { }
Then, click on the Body object and open the Animation Window. As usual, the AnimationListener script must be attached to the Body object. Pose the character on an expected initial pose, then press the record button. Unity will ask to create a new animation file with the .anim extension. Start keying and animating the character; there are many tutorials for this. The specific part that concerns Shadowrun mechanics is that you may add a couple of Events that'll interact with it. There are three types of event for the function OnAnimEvent:
OnFootfall will tell the game to play a footstep sound on this frame, when applicable.
OnAction will tell the game the action is happening on this exact frame. If it's a gun attack action, the game will play the gunshot sound and create the muzzle flash.
OnComplete will tell the game the action is complete. Usually on the last frames of the animation.
The button to add an Event is just next to add keyframe. Click on the event, select the function OnAnimEvent and type in one of these three event names (case-sensitive!).
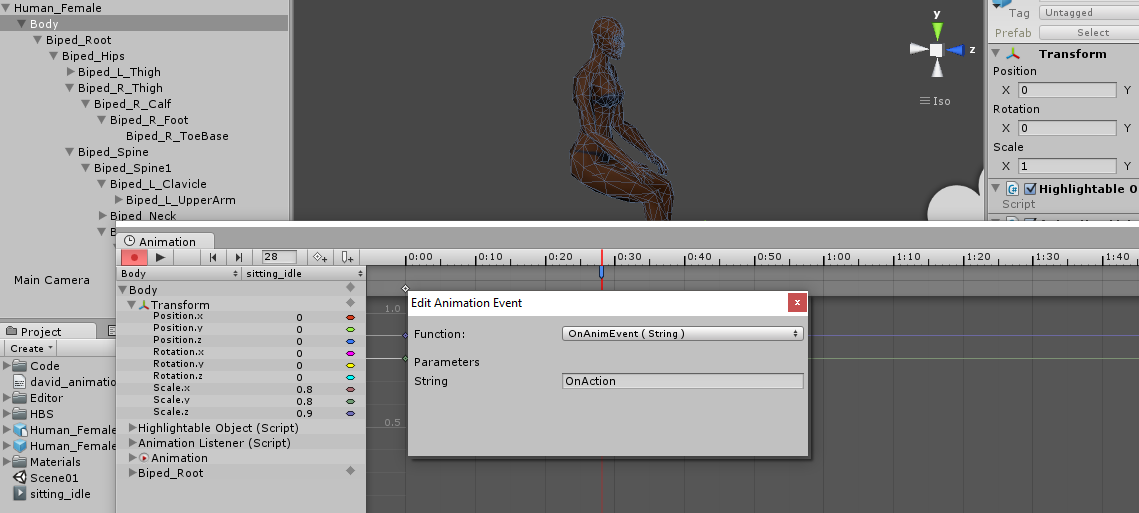
Finally, when you finish animating, click on the animation in the assets and choose wrap mode:
Once will play the animation once. Appropriate for single actions, like attacks.
Loop will loop the animation. Appropriate for states like standing_idle_something...
Name your animations using the same schema the game uses: standing_idle_pickingnose, standing_attack_unarmed_flyingkick and so on. Build the assetbundle and place it in your own folder.
In your Content Pack create the file anims.mf.txt in the \data\misc folder. It's a manifest file that the Shadowrun Editor reads. This is how it looks in the Dead Man's Switch Content Pack:
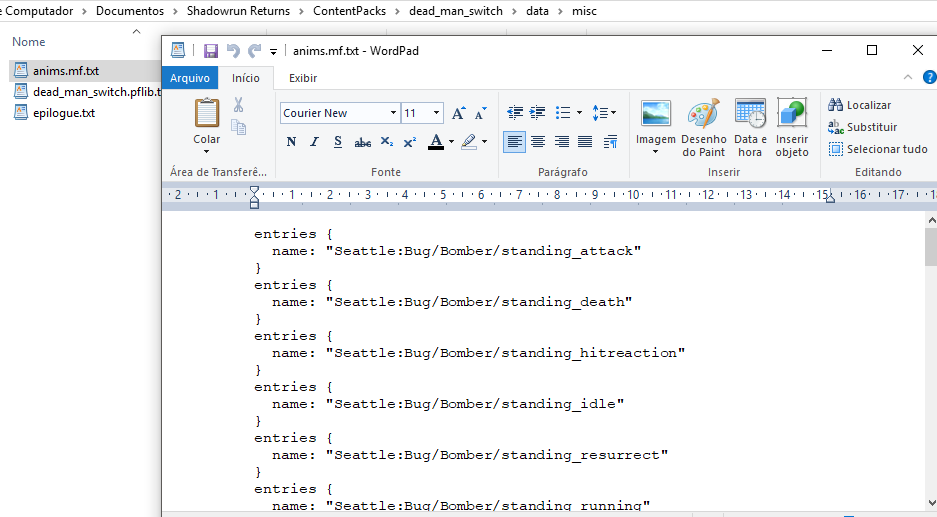
So, name your assetbundles using the same schema: standalone\Foldername\ foldername_animations_group_subgroup.assetbundle. And in the manifest the entry goes like Foldername:Group/Subgroup/animationname
Then open the foldername_animations.assetbundle with UABE. Dump export AnimationLibrary Monobehaviour and keep UABE open. Edit the text dump with Notepad. If it's your own folder and you had created a copy of Seattle_animations.assetbundle in it and renamed it, just overwrite the animation names. If it's Seattle itself, you should add new entries starting from entry [563] and remember to modify the header to say the array now has 564 (or more) items and you'll also have to create an UABE executable. (anyway, I recommend using your own folder to avoid this) Dump import the modified AnimationLibrary and save the new foldername_animations.assetbundle.

Don't worry: this won't cause a Bug animation to be missing, provided you leave the Seattle folder intact and work with a copy in your own bundle folder.
The animation should be ready to use in the Editor via the trigger Play animation from manifest. However, animations in a new bundlegroup folder will probably not play when you test the scene unless you create a data only content pack with the new animation manifest and use it as dependency of your current UGC OR a prefab in the scene must be from your new bundlegroup. It is also reccomendable to name your data only pack with the same name as your bundlegroup. (the Seattle content pack loads animations from the standalone/Seattle folder, the Berlin content pack loads from the standalone/Berlin folder etc)
Also, you can add animation modifiers to use with the trigger Set Animation State of Actor to Animation Modifier if your animation is in the bundlegroup_animations_general assetbundle in your bundlegroup folder and you add the text file animmods.alib.txt to your data/misc folder. Its entries should follow this example from the Berlin pack:
entries {
    ui_name: "panhandling"
    mod_name: "sitting"
  }
  entries {
    ui_name: "leaning"
    mod_name: "leaning"
  }
where mod_name is the last part of the name of the animation in your bundlegroup_animations_general bundle and ui_name is how it will show in the Set Animation State of Actor to Animation Modifier trigger list. For example, "panhandling" in the list will actually use the animation berlin:general/standing_idle_sitting (nice oxymoron, by the way).
Getting the Animation to work With Game Mechanics (still under research)[ | ]
The game, through the AnimationController script, looks for animations for weapons and abilities based on their names. The most common for creatures would be the schema
bundlegroup:race/identity/stance_action_type_mod
However, if you write "female" in your bundle the game will use the schema
bundlegroup:race/gender/stance_action_type_mod
If you write "general" in your bundle SRR will use it for all metahuman races except ghouls.
Items rule animations via the entry anim_type in their data sheets. ItemType and AnimType are hardcoded in the game in the ShadowrunDTO.isogame ItemType and AnimationController (under public enum AnimationGroup) scripts. Hypothetically, if you use dnSpy and add a new AnimationGroup entry you'll need new animations for standing, running, crouching stances (if it's a weapon). That's not worth the bother to me. Even a bow and arrow can be properly carried around with AnimType_Pistol.